Mid Week blog #17 - Heat Embossing
Hello and welcome to my mid week blog,
These mid week blogs are designed to be shorter than my Sunday blogs so that I can share techniques, card design or other tips and tricks with you. This week we are looking at how to use heat embossing.
Heat embossing is created when you stamp an image using a clear ink called Versamark & then applying powder or leaving clear. The ink &/or powder is then heated with a heat gun, a little like a small hair dryer which melts & sets the image. Embossing allows you to add colour to a card, create a stained glass type of finish or can also be used clear to give a tone-on-tone or watermark effect.
The tools you will need are:
1. Versamark ink pad or similar product such as Perfect Medium - a clear ink medium that allows the embossing powder to only stick to the stamped area. If heated without powder the ink will set to create a tone-on-tone or watermark effect.
2. Embossing powder - is a very fine powder made from plastic that melts & hardens when heat is applied. Powders are available in a range of different colours & can be purchased in basic colours from Stampin' Up® or other craft suppliers.
3. Heat gun - similar to a hair dryer but not as strong a force. The heat melts the plastic of the embossing powder & sets the image. You can then colour or shade the area if you would like to, giving it a stained glass effect.
*4. Embossing buddy - a bag containing a powder that helps to remove the static from your cardstock prior to stamping. It also helps by not allowing the powder to spread to areas that don't have Versamark on it. Little bits of the powder can sometimes find their way onto the card & will set there if heated. Some people even make their own using cotton material filled with talcum powder.
 |
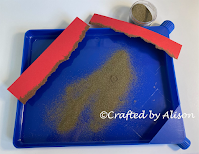
| The embossing powder tray in use. |
So, the steps to follow are:
1. Prepare the cardstock by rubbing an Embossing Buddy or anti-static pad across the surface.
2. Apply Versamark evenly over the stamp surface & stamp image or sentiment.
3. With a piece of scrap paper under the cardstock, sprinkle the embossing powder evenly over the stamped area then tap excess powder back into the container. #Or you can using an embossing powder tray as pictured above.
4. Check that there are no little bits of powder outside of the stamped area as this will set as well as the image & is very difficult to remove. I use a small paintbrush or my fingernail.
5. Hold the heat gun approx. 15cm from the card stock & gently move the airflow across the card, also heating the underside occasionally to ensure the card doesn't warp. You will notice that the powder changes it's appearance & will change from powdery, matte finish to a shiny, glossy finish. This is when you stop heating as too much heat will burn the card & embossed image.
Here are some examples of using heat embossing on cards. Using heat embossing for sentiments also adds a different element to cards & is used often by a lot of crafters.
 |
| Plain white on vellum. The sentiment in the right hand corner is also heat embossed then fussy cut. |
 |
| Embossing powder on torn edges. |


Comments
Post a Comment