Posts

Showing posts from February, 2022

Case the catalogue

Image
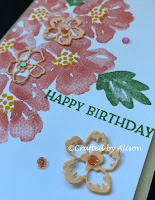
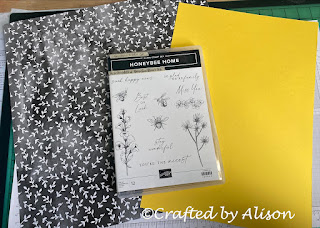
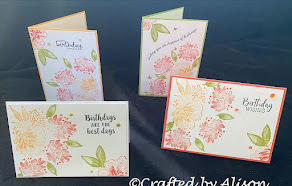
 Hello and welcome to my blog. If this is your first visit, I hope you enjoy it & come back again. If you are returning, welcome back & thank you! This week I have a couple of cute cards made by casing the cards created for the Stampin' Up®  May '21 to April '22 Annual Catalogue. Many Stampin' Up® demonstrators post pics on their blogs & Facebook pages of cards they have Cased so I thought I'd include some in my blog this week. Here's my first card, inspired by a card featured on page 22 of the catalogue. These close ups show you the beautiful colours of the flowers & the sequins. Blossoms in Bloom is the gorgeous stamp set used for this card. I started with a Crumb Cake card base & added a Basic White matte. The catalogue card uses yellow for the main flowers but I wanted a bit of contrast so I used Calypso Coral with Mango Melody for the centres & Garden Green for the leaves. I die cut some small Pale Papaya flowers using the Many Layer

Mid Week blog #20 - Card Sketch #2

Image
 Hello and welcome to my mid week blog, These mid week blogs are designed to be shorter than my Sunday blogs so that I can share techniques, card design or other tips and tricks with you. Today I am sharing another card sketch with you to help when inspiration needs a little kick start or just for something fresh. Hope you like it! This Card Sketch is inspired by a card in the Annual Catalogue that I am 'Casing' in my Sunday Blog. The original card features on Page 25 of the catalogue & this is my version of it. Now I don't have any fancy software that can create the Card Sketches for me so please excuse my hand drawn sketch. It does the job though. Card sketches are a great way to get your mojo back if you find yourself in a little creative slump or just for a little change. I hope you find some inspiration from this design. I would love to see any creations you make with this sketch so please feel free to post a pic on my Facebook page, craftedbyalison. That's it

Gumballs galore!

Image
 Hello & welcome to my blog, If this is your first visit, I hope you enjoy it & come back again. If you are returning, welcome back & thank you! This week I have a couple of cute cards made using the new Gumball Greetings stamp set & matching Gumball Machine dies. Both cards are quite easy to make but look so cute with the colours & sentiments. I really enjoyed making both of them. As the sentiment says, this is the sweetest card to give to someone special!   To make this first card I started with a Basic White Card base, added a matte layer of Granny Apple Green then a matte of Friendly Hello DSP which is free during the current Sale-A-Bration promotion. Adde to these layers are Granny Apple Green cardstock die cut with the Stitched So Sweetly dies. I then stamped the small gumball machine & a sentiment in Smokey Slate before colouring them with a rainbow of Stampin' Blends colours. These two layers were added to the base & the card is finished off wit

Mid Week blog #19 - Treat boxes

Image
 Hello and welcome to my mid week blog, These mid week blogs are designed to be shorter than my Sunday blogs so that I can share techniques, card design or other tips and tricks with you. This week I will be showing you how to create a cute little treat box. I got inspiration for this box from Pinterest when I checked out a post by Buckey Inklings. So that you can easily create one of your own I've taken step by step photos of the process I worked through when making my box. I started with some Beautifully Penned DSP, Daffodil Delight cardstock & the Honeybee Home stamp set. Both of these pieces were cut to 18 x 15cm. They were both scored 5cm in from all 4 sides. A line was then drawn from the bottom 2nd score line to the top outside score line. Cut as pictured. This is the side that will be showing. Glue the end with 3 tabs as shown. Repeat the cutting with the cardstock (as shown) for the bottom of the box.  Glue the ends with the shorter tabs. Glue the longer tabs but leave

Flowing Flowers hand made DSP cards

Image
 Hello & welcome to my blog, If this is your first visit, I hope you enjoy it & come back again. If you are returning, welcome back & thank you! Today I will be showing you the cards I made using hand made DSP. During my mid week blog I showed you how to make your own DSP using cardstock, inks & stamps & now I am showing what I created with that DSP. I hope you like them.     Here are the four cards I made with the DSP by trimming .5cm off each piece & mounting on 4 different shades of cardstock. Each card is detailed below. Basic white base with the DSP mounted on dimensionals & some olive matte dots. The sentiment is from the Beautiful Friendship stamp set.   Calypso Coral card base with some Artistry Blooms sequins. The sentiment is from  the Fancy Phrases stamp set.   The last two cards are orientated to portrait. The left card uses Pale Papaya cardstock with a few Genial Gems & the sentiment from the Beautiful You stamp set. The card on the right us

Mid Week blog #18 - Make your own DSP

Image
 Hello and welcome to my mid week blog, These mid week blogs are designed to be shorter than my Sunday blogs so that I can share techniques, card design or other tips and tricks with you. This week I will be showing you how to create your own DSP.  I started by collecting all of the supplies - Basic White cardstock, Ink pads, stamp sets. I chose The lovely Flowing Flowers stamp set from the new Jan - June '22 mini catalogue & added the Artistically inked stamp set for some green leaves. I started by stamping the flowers around the edges in Pale Papaya & added a centre flower in Calypso Coral. Next I added some smaller Calypso Coral flowers around the Pale Papaya flowers then used Pear Pizzazz to add leaves. Now the DSP is finished. Quick & easy. I cut the cardstock into quarters..... ...and now I have 4 card fronts ready to make some cards! So you see making your own DSP is super simple. You just need some inks, stamps & imagination. I will be using these pieces for

Rainbows & Sunshine

Image
  Hello & welcome to my blog, If this is your first visit, I hope you enjoy it & come back again. If you are returning, welcome back & thank you! This week we are looking at the lovely new products available from Stampin' Up® that feature Rainbows, Sunshine & Raindrops. The papers are so bright & cheerful they certainly brighten your day. This week I have created two cards for you that are bright & cheerful but quite simple to make. Later in this blog I will also share with you a desk calendar I made using the Sunshine & Rainbows DSP that co-ordinates with the Rainbow of Happiness stamp set & Brilliant Rainbows dies. Let's start with the sunniest card! The DSP inside & on the card front is from the free Sunshine & Rainbows pack available during Sale-A-Bration. I chose Melon Mambo, Daffodil Delight, Bermuda Bay & Fresh Freesia for the arches of the rainbow, stamping onto some Basic White then mounting it on Bermuda Bay. The bottom of