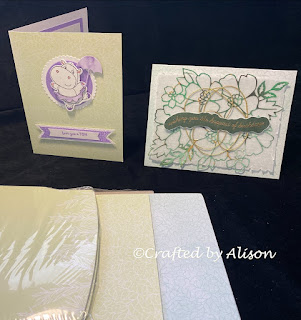
Pretty Greens card set
Hello & welcome to my blog,
My name is Alison & I am an independent Stampin' Up® demonstrator in Melbourne, Australia. I love creating cards & gifts for my loved ones & this blog will show you how to create something special for those you love. Today's blog is all about making a simple card or adding to it to create something a little bit more special. I hope you like what I've made!
This week I've made some lovely cards using card bases that are free during Sale-A-Bration in July & August. These lovely card bases come in Soft Sea Foam & Pool Party & have a delicate print already on the front. They have matching envelopes also. These have proved so popular that they have all sold out which is very disappointing but none the less I promised to show you some creations using them so here they are....
For the first card I went for a really simple design. I chose Highland Heather as the contrast colour as it beautifully compliments the delicate Soft Sea Foam card base. To begin, I diecut a Basic White scalloped edge circle plus a regular circle in Highland Heather using the Layering Circles dies. As I already had one of the Hippest Hippos prepared from last week's blog I decided to use her for this card. The tutu was stamped onto some Simply Marbleous DSP, fussy cut then popped up on some dimensionals. Her umbrella was diecut using the Hippo dies. The sentiment is from Hippest Hippos. After dovetailing the ends I cut a piece of Highland Heather grosgrain ribbon, dovetailed it & adhered it to a scrap of embossed paper which I also dovetailed. A quick & easy card.
For the second card I used a diecut from the retired Many Layered Blossoms dies. Expressions in Ink DSP gives the diecut it's gorgeous variegated colours. This was layered over some of the new Layering Designs vellum which I roughed the edges of with the blade of some scissors. The sentiment is from the Quite Curvy stamp set which I embossed in Gold on Evening Evergreen cardstock. I fussy cut it out, glued it to some Basic White cardstock then fussy cut it again, just to give it some definition against the greens of the diecut. For a little bit of decoration I adhered some gold twine behind the sentiment before mounting with dimensionals. The trick when working with vellum is clever placement of adhesive. I used glue dots & placed them behind where the sentiment lies & where there are larger areas of DSP in the diecut. As the vellum is opaque it hides the dots very well.
If you would like to order any of the supplies I used today you can head over to my Stampin' Up® shop using the links below.
If you would like to purchase any of the cards I feature in my blogs they can be found in my FaceBook shop at craftedbyalison.
Thanks for stopping by, til next time, take care & keep creating! XX Alison
Highland Heather Classic Stampin' pad
Highland Heather Stampin' Blends


Comments
Post a Comment