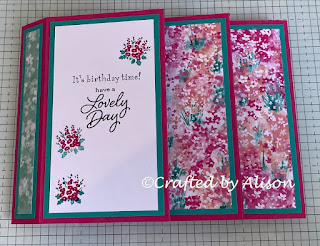
A 3D project to create a triple box card
Hello & welcome to my blog,
My name is Alison & I live in beautiful Melbourne, Australia. For those of you who have previously visited my blog & are now returning, thank you. For those of you who are here for the first time, welcome!
Here's a little bit about me. I love creating cards & gifts for my loved ones & this blog will show you how to create something special for those you love. I blog twice a week, once on a Sunday where I mainly showcase a stamp set or dies, embossing folders, projects & sometimes special DSP and Wednesday evenings when I highlight a technique, fun folds or tools & tips. I would love to hear from you if you have any questions or suggestions & my email address for that is craftedbyalison@gmail.com.
Stampin' Up® 's Annual Catalogue was released last year with a very different format & it's a beauty! It's set out quite differently to previous catalogues but there are benefits to that. They now have sectioned it to have beginners, which is a step by step collection of materials in kits, then there is quick & easy where you select base materials & packs of pre-printed or diecut materials plus some stamp sets then there is create your way where you choose all the materials, stamps etc yourself & create your way! In the quick & easy section Stampin' Up® have also provided some inspiration with a colour wheel & information of various ways to use colour combinations. I explored this in a bit more detail in my 1/1/25 mid week blog. The new mini catalogue was launched on January 7th with lots of lovely stamps, dies & papers to ooh & aah over. If you would like a copy of this new catalogue then please contact me at craftedbyalison@gmail.com. Stampin' Up® also have products available only online. These are called Online exclusives & have no end date, when the stock is sold out, that's the end of it.
This week I am sharing a 3D project with you. It's called a Triple Box card & is slightly larger than my usual cards but fits nicely into a 5" x 7" envelope. It's construction is easy but the end result allows it to stand easily on it's own & it has a WOW factor. I've taken lots of pictures of the steps so that you can see how easy it is & maybe create one yourself?
First step - gather your supplies. I have used a few retired products this week as the colours of the cardstock complimented the DSP beautifully & the sentiments worked well. It's always nice to be able to use your supplies after they have been retired.
Here is a list of all of the supplies you'll need apart from the front sentiment.
I chose Melon Mambo for my base colour, Bermuda Bay (retired) for my contrast and the DSP is Bloom Impressions, a free Sale-A-Bration item with qualifying orders. Here are all the pieces cut, ready to assemble.
Assembling the boxes is the first step. The three 5" x 8 1/4" Melon Mambo pieces had been scored at 1", 4", 5" & 8" then burnished well. Adhesive was applied to the 1/4 section & the larger flap was adhered to that to create each box.
NEWS & REMINDERS:
- Stampin' Up®'s Annual Catalogue is a beautiful piece of artwork as well as an amazing resource for crafting. It's very different to any other catalogue that I've seen from Stampin' Up®. They have changed the front cover from featuring cards or supplies to a casual stamping picture as well as a radical change to the layout of the contents. There are still lots of beautiful pics of the products & ideas aplenty, it's just set out differently. I think you'll love it. If you would like a copy of the Annual catalogue then send me a message at craftedbyalison on Facebook or email me at craftedbyalison@gmail.com & I'll send you one.
- The Mini catalogue was launched on 7th January! Woohoo!! There are lots of gorgeous new items ready to inspire your creativity. If you would like me to send you a copy, send me a message on my facebook page or email me.
- Some of you may know that Stampin' Up® purchased a quantity of scrapbooking materials when Close To My Heart folded. They have taken on any CTMH demonstrators that wanted to cross over & have slowly been including scrapbooking products into our supplies. They now have a dedicated digital mini catalogue, exclusively devoted to scrapbooking products available here at my online shop. There are a number of kits available if you'd like to start your scrapbooking journey or if you already scrap then check the kits out! Here is a link for the new scrapbooking brochure that launched on January 7th.
- Don't forget the Online Exclusive products with new products added and available now. Check out my online shop here. Stampin' Up® release a new items regularly. The lastest selection of Online Exclusive products launched on January 7th and there are some gorgeous new products to tempt you. Why don't you check them out?
If you feel that you need to add this to your list then click here to purchase one from my online store.
If you would like to purchase any of my creations that I feature in my blogs they can be found in my FaceBook shop at craftedbyalison or you can order something unique.
I hope you've enjoyed today's post. I certainly had a lot of fun playing around with this stamp set again. If you would like me to send you a copy of the current Annual catalogue or the new mini then please message me via my FaceBook page, Crafted by Alison or send me an email at craftedbyalison@gmail.com.


Comments
Post a Comment