Hello & welcome to my Mid Week blog,
I am an independant Stampin' Up® demonstrator with a passion for creating. I have a regular weekly blog on a Sunday that explores different stamp sets, die sets or products sold by Stampin' Up® and my Mid Week blog explores tips, techniques, card sketches, colour challenges & lots of other ideas to help you make the most of your crafting time. There are ideas for 'just starting out' crafters, 'in-betweeners' and more avid crafters.
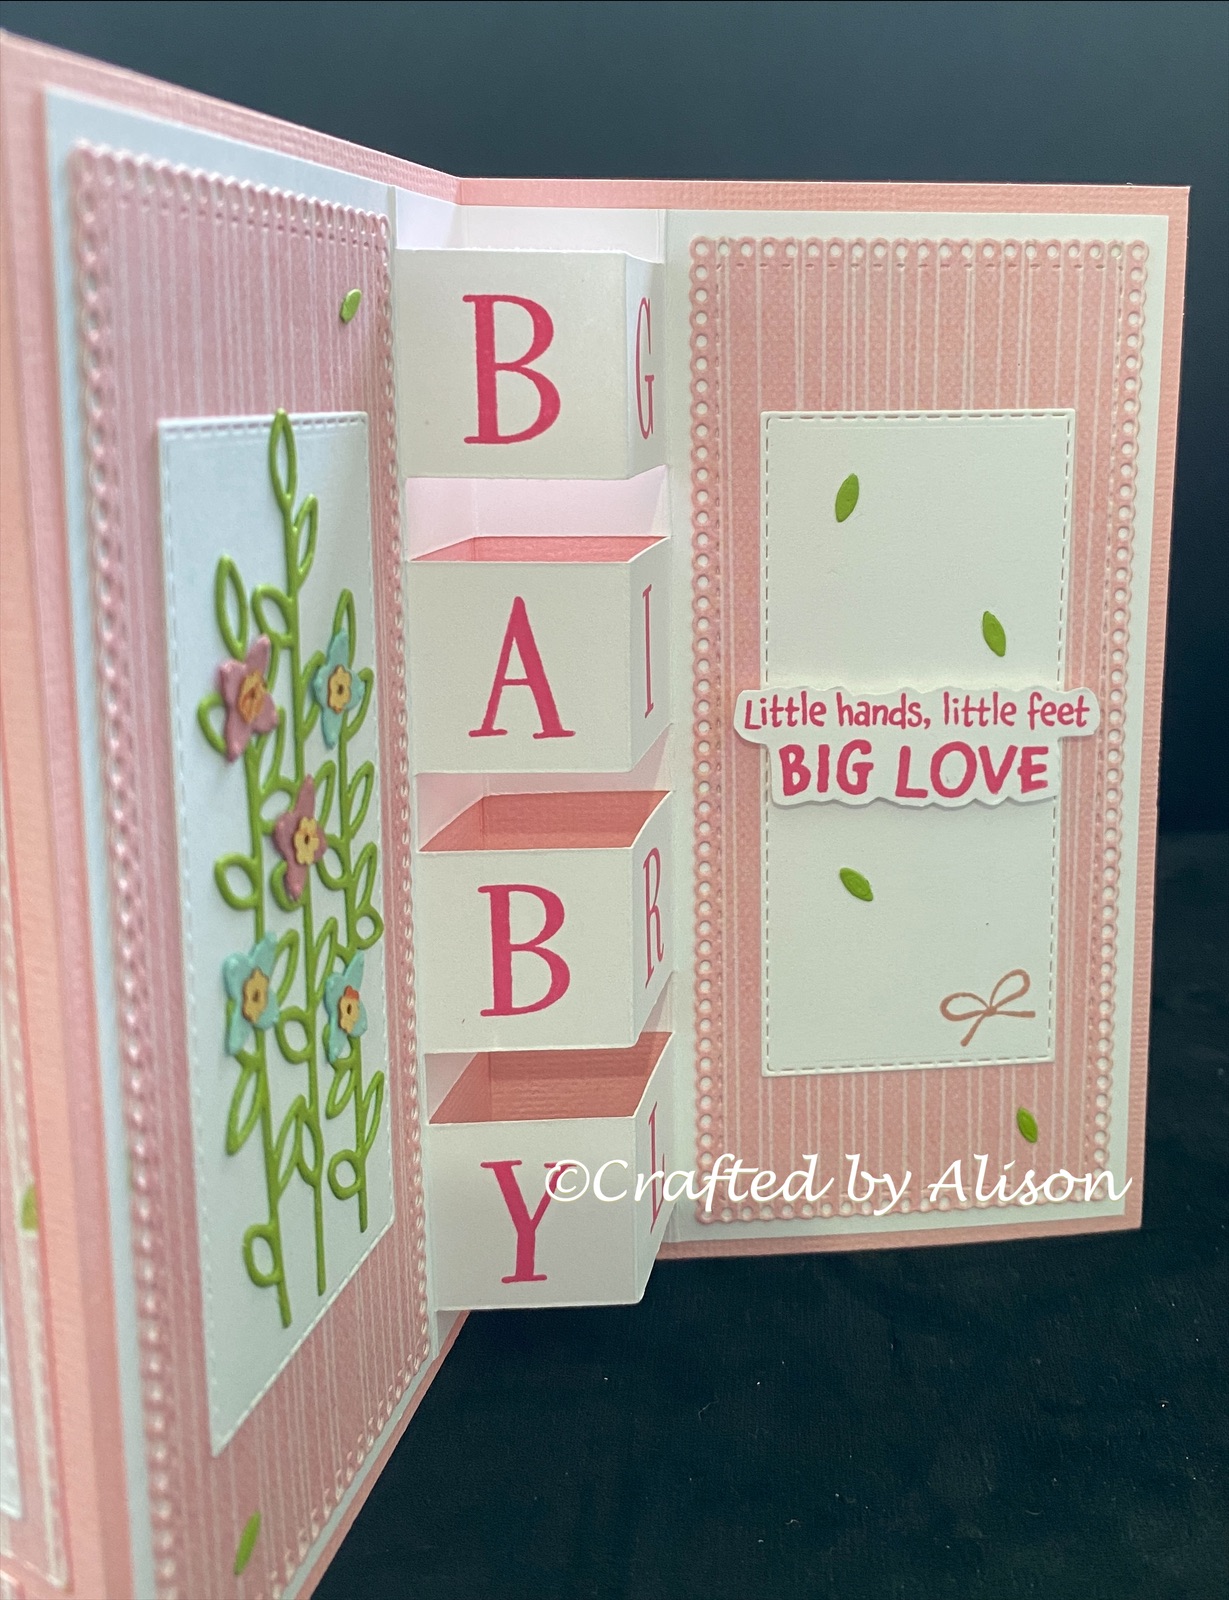
This week I will show you how to create a special occasions card with a pop up greeting inside. It's quite a simple techniques once you have the instructions to follow. I made some cards for work mates who were having babies & they have a little bit of WOW when they are opened.
I absolutely love this design!
Materials needed to create this card are DSP, plain cardstock, All For Baby stamp set, Baby dies, Stitched Rectangle dies, trimmer, Well Written dies (for the flowers & stems) & some alphabet stamps.
To create this card you will need a piece of 12" x 12" or 30 x 30cm cardstock for the base, cut to 14.8 x 30cm & scored at 10cm & 20cm. Fold in a Valley/Mountain fold. This is the base done.
To decorate the front I used a piece of DSP diecut with a large Stitched Rectangles die & a smaller one to fit the sentiment. In Basic White I cut a medium Stitched Rectangle & a banner size that fit the sentiment. Using DSP & plain cardstock that picks out & compliments the DSP colours I diecut 3 baby rompers & 3 hangers. The flowers & stems were diecut from scraps using the Well Written dies. The rompers were layered & glued to each other then raised on dimensionals.
The inside layer looks daunting but is easy if you take it step by step. Start with a piece of Basic White, measuring 14 x 19cm. Score on the long side at 6, 8.5 & 11cm. Turn 90degrees.
Now we're going to create the pop up mechanism.
Using the cutting blade of your trimmer, you will be cutting from the first score line down to the 3rd score line. You may find it easier to mark the cardstock with a faint pencil line or confident to cut using the trimmer ruler. There will be 8 cuts in all as follows - 1.5cm, 3.5cm, 4.5cm, 6.5cm, 7.5cm, 9.5cm, 10.5cm &12.5cm. There will be a Valley/Mountain/Valley fold all the way from the top to the bottom of the card with this area.
But before we do that, we need to stamp the message. I used letters to create BABY GIRL but you could also use GOOD LUCK or other messages. If you need to use more than 4 letters then measure & cut the centre strip to allow for them all to fit, leaving a small strip in between each letter. Now that the letters are in place, partially fold the cardstock & pop the letter cubes out using your finger or a Take Your Pick tool. When folded, along the spine you will only see the thin strips at the top of the card & in between each letter.
The next step is assembling the inside of the card. Glue all areas of one side of the white cardstock EXCEPT the blocks with the letters on. Line up the centre score line with the centre of the card & stick that side down. Allow time for the glue to hold then do the same with the other side. You will find it easier to close one flap over the other, then close the card down over it.
For the decoration on each side, I cut a strip of DSP using Ornate Thanks & Basic White & Stitched Rectangles. The flowers & leaves were diecut using the Well Written dies & adhered to one piece of the cardstock using a fine or needle nose tip. I stamped a few leaves & a bow on the other piece, stamped & fussy cut the sentiment & raised it on some dimensionals.
The final step is to add a piece of white cardstock of the centre back panel. I added a couple of images for interest.

So, a card with a WOW factor that when broken down into steps is actually easier than you might think.
That brings us to the end of another Mid Week blog. I hope you've enjoyed learning how to make this fancy fold card. I'd love to see any creations you make using this technique so please feel free to head over to my FaceBook page, craftedbyalison, & post a pic. My next blog is on Sunday looks at how to use acetate for windows on cards. Next week's Mid Week blog will show you how to create background interest by just using Stampin' Blends alcohol markers. I hope you can come back for both of them.
Thanks so much for stopping by, I hope you have time this week to do some creating of your own. Til next time, take care & keep creating. XX Alison


Comments
Post a Comment