Mid Week Blog #60 - Gift wrapping & giving options
Hello & welcome to my blog,
My name is Alison & I am an independent Stampin' Up® demonstrator in Melbourne, Australia. I love creating cards & gifts for my loved ones & this blog will show you how to create something special for those you love. Today's blog shows you how to create bonbons for gift giving. I had a good play around with sizes & materials to see what works & what doesn't. I hope you enjoy it!
Here are 3 different sizes I created for this blog. The top one is an eight sided design. The centre one is six sided. The smaller bottom one is 5 sided. The following pictures show the steps I took to create the centre bonbon.
To begin I used a regular scoreboard.
With a piece of DSP measuring 17.5 x 30.5cm I scored the long side at 5cm & 25.5cm.
On the short side I scored at 2.5cm intervals for the whole length. The following pics show the measurements as the DSP doesn't show the scorelines clearly.
Next I used an Envelope Punch board.
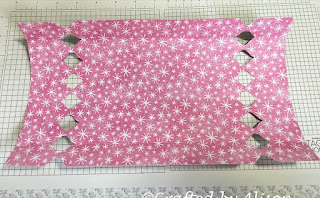
To create the diamond holes I placed the DSP at the 5cm/2" mark of the punch board. It's important to take off the top edge as this allows the bonbon to be folded properly. Then I folded each score line & punched through the 2 folded layers to create the diamond shape. I continued doing this until I got to the bottom edge & punched that as well. This was done on both sides.
Here's a close up of the punched diamonds to show you that both the top & bottom edges were punched out.
The next step is to apply glue to one edge. Fold the bonbon roughly in half & fold the glued section over the bottom, folded layer. Hold down to ensure the glue is dry before opening the bonbon up.
Gently pinch the ends in to form the valleys that the ribbon will tie around.
So now to talk about what didn't work!
The largest bonbon is a good size for lots of different types of gifts, handcream, chocs, hair accessories etc but I would recommend using a thicker cardstock & then adding 2cm strips of DSP if you want to use this this size for things such as votive candles or body wash.
The bottom, smaller, 5 sided bonbon is a cute size but I had to mess around with bending the ends to create the valleys. Still works though.
Finally, I tried using glitter paper (Woolworths branded) to see what that would look like. Firstly, the scorelines tended to break the fibres of the paper a little more than regular cardstock. Secondly, I used a smaller design to suit a single handcream but when you make the scorelines smaller (2cm) it makes it impossible to use the punch board for the diamonds as there just isn't enough room left. Finally, liquid glue doesn't work as well on glitter paper as it does on smooth paper! Lesson learned though.
I hope you enjoyed this blog. I'd love to see what you come up with if you try it so feel free to post some pics on my FaceBook page at craftedbyalison.
That's all I have for you for this post. Thanks for stopping by. My next blog will be on Sunday & I'll be showing you how to make a Christmas tree card made from scraps. Next week's Mid Week blog looks at making a faux tile design. Super easy but very effective. I hope you can join me for both of those.
Til next time, take care & keep creating. XX Alison


Comments
Post a Comment