Hello and welcome to my mid week blog,
These mid week blogs are designed to be shorter than my Sunday blogs so that I can share techniques, card design or other tips and tricks with you. Today I will show you how to use the super cute little fingertip sponge daubers to create different finishes.
#1. Background colour.
 |
| Step 1. Gather materials. |
 |
| Step 2. Gently dab the dauber onto the ink pad. |
 |
| Step 3. The inked up dauber. |
 |
Step 4. Gently rub the cardstock with the dauber to create the amount of colour you want.
|
#2. Edging highlights.
 |
| Using some acetate behind the cardstock, gently rub inwards from the edge of the cardstock to give a speckled finish. |
#3. Fill in colour.
 |
| Step 1. After stamping your images onto the cardstock gently rub outwards from the centre of the flower using a flicking motion. |
 |
Step 2. Continue adding colour outwards until all the flower is coloured to your liking.
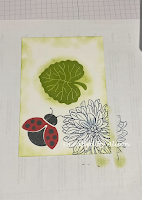
As you can see from the pictures above I have used the dauber to create most of my card images. I stamped the ladybug & leaf in solid colours & this image formed one of the cards I made for my regular Sunday blog on 26th December. Full details of the colours used & the completed card are on that blog, hope you find time to check it out.
When I started thinking about what to show you about using sponge daubers I came up with quite a list of different ideas so I've only shown 3 this time but will come back with other ideas in future blogs. In the meantime I hope you grab some daubers & have a play around like I did. Please post pics of your creations on my FaceBook page is you'd like to share. I will have some lovely projects for you on my Sunday blog featuring some of the products from the gorgeous Eden's Garden bundle & the papers are only available until the 3rd Jan 2022 so if you love it as much as I do you'd better order some quickly or you'll miss out!
That's all from me for this week. Thanks for stopping by. I look forward to sharing more with you again. Til next time, take care & keep crafting. XX Alison |


Comments
Post a Comment