Posts

Showing posts from January, 2022

Spotlight on DSP (30/1)

Image
  Hello & welcome to my blog, If this is your first visit, I hope you enjoy it & come back again. If you are returning, welcome back & thank you! Today I will be showing you different ways to use our stunning DSPs. Some cards use DSP to add detail & some are the main feature of the card.  This desk calendar was made using the new Sunshine & Rainbows DSP that is free during Sale-A-Bration. I used Magenta Madness as the colour to highlight which gives the calendar a lovely bright feel. The front of the card base is scored 1/2 way & a piece of Magenta Madness, matted with the DSP is added to the bottom half of the scored front. The mini calendar is mounted on Magenta Madness & Basic White. The sentiment under the calendar is from the retired Beautiful You stamp set while the sentiment inside the mounted circle & the dots & hearts details are from the Rainbow of Happiness stamp set. This was made for a work friend for her birthday. My Mid Week blog on We

Mid Week blog #16 Using strips for backgrounds

Image
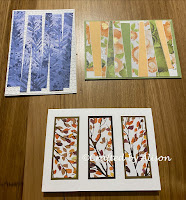
 Hello and welcome to my mid week blog, These mid week blogs are designed to be shorter than my Sunday blogs so that I can share techniques, card design or other tips and tricks with you. This weeks topic is how to use strips of DSP to create backgrounds or mattes for cards. Nearly everyone that makes their own cards will end up with strips & offcuts from projects & rather than throw them out, here's an easy way to create unique card fronts! As you can see from the photo above, strips are a great way to create a variety of different cards. Now here's a little info on how I made each card front. This card front started off with a scrap of Beauty of the Earth DSP measuring 9 x7.5cm. I cut it into 3 equal strips then backed them with co-ordinating cardstock. I had a few strips of this stunning blue Beauty of the Earth DSP & cut them into random widths. Some are raised on dimensionals, the rest are glued straight onto a piece of Basic White which had been embossed with

Amazing Silhouettes, amazing versatility!

Image
  Hello & welcome to my blog, If this is your first visit, I hope you enjoy it & come back again. If you are returning, welcome back & thank you! This week I played around with the Amazing Silhouettes stamp set which is so pretty. I made 3 cards as there are 3 stamps to the set. Here's the first one ..... When I saw the butterfly I wanted to create somewhere where it could fly. That's how I came up with the faux woodland themed background. I started with some leafy DSP from the Forever Greenery DSP then overlaid this with some vellum which I ran through the embossing machine using the Woodland Embossing folder. I fussy cut some leaves out to glue over the vellum to give a 3D effect. Before sticking this down to the card front I ran some Old Olive Shimmery ribbon around & tied a knot. Next was mounting the butterfly, stamped in Old Olive & then mounted using dimensionals. With the embossing & the 3D leaves I don't think it needs anything else on the f

Mid Week Blog Series #15 - Tools

Image
 Hello and welcome to my mid week blog, These mid week blogs are designed to be shorter than my Sunday blogs so that I can share techniques, card design or other tips and tricks with you. Today I will be looking at some of the tools I use to help make my creations. 1. Paper Trimmer -  Probably the most important tool to have in your kit. Without a trimmer you have to cut everything by hand which is a pain & won't give you straight lines. The trimmer also has a scoring blade which is super helpful when making multiple score lines. There is a ruler on the base of the trimmer as well as on the flip out arm. The clear plastic that holds the blades can be lifted to place the cardstock or DSP & holds it in place when cutting. Stampin' Up® supply the trimmer with Imperial measurements but you can also order a Metric blade holder. The blades have little arrows so that you can slide it along until you reach the measurement you want to cut to. This is so helpful when cutting out

Using card sketches to create unique cards

Image
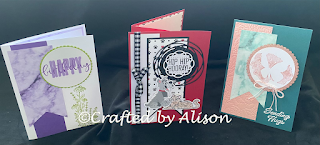
 Hello & welcome to my blog, If this is your first visit, I hope you enjoy it & come back again. If you are returning, welcome back & thank you! One of the cards I am showing you today was included in my Mid Week Blog on Wednesday as they show you how to start with the one card sketch but create very different cards. Card sketches are used by loads of creative people around the world to give them new ideas, refresh their creativity when their MOJO has gone on holidays or simply to challenge themselves with something different. Here are the cards I made & featured in my Mid Week Blog #14.   I started off with a simple card, using Gorgeous Grape & Granny Apple Green cardstock, contrasting Simply Marbleous DSP, stamping directly onto the card front using the Dragonfly Garden stamp set & Granny Apple Green ink & co-ordinating the sentiment from the Biggest Wish stamp set in Fresh Freesia & Highland Heather inks.  For the next card I decided to go with some b

Mid Week Blog Series #14 - Card sketches

Image
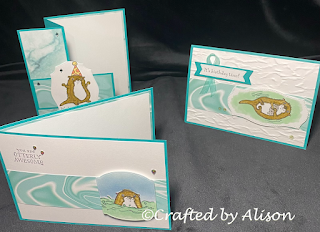
 Hello and welcome to my mid week blog, These mid week blogs are designed to be shorter than my Sunday blogs so that I can share techniques, card design or other tips and tricks with you. Today I will be looking at card sketches. Sometimes you get stuck in a rut with card designs or you have lost a bit of your MOJO. That's where card sketches come into their own. There are so many different blogs, pins, #'s etc out there that can give you ideas so if you don't like the design I share today or want more ideas then just google card sketches or head over to Pinterest for more inspiration.  Today's sketch was chosen as it is simple, containing only 3 additional elements on the card front and can be used in portrait or landscape. I have created a portrait, traditional opening & a fancy fold to share with you today. All of these cards used the same basic sketch - a strip of cardstock on the left, a banner & a circle. From there I changed each layout slightly by using

Check out these Awesome Otters!

Image
 Hello & welcome to my blog, If this is your first visit, I hope you enjoy it & come back again. If you are returning, welcome back & thank you! The cards I am showing you today were posted in my Mid Week Blog on Wednesday as they show you the Step It Up technique where you start with a simple card then add to it to make it a little fancier & then add more or change it slightly to make it even better. This week's cards feature the super cute new stamp set Awesome Otters. One of the best things about it, after its cuteness, is the fact that you can get it for FREE when you order $90+ in the new Sale-A-Bration that is happening now. WOW! So let's start with the first, simpler card. To create this simple card I used Bermuda Bay cardstock for the base, added a matte of Basic White then a strip of the free Simply Marbleous 6 x 6 DSP. I stamped the Otter in the water then coloured him in using Soft Suede, Pool Party & Just Jade Stampin' Blends & using the