

Check out these Awesome Otters!
Hello & welcome to my blog,
If this is your first visit, I hope you enjoy it & come back again. If you are returning, welcome back & thank you! The cards I am showing you today were posted in my Mid Week Blog on Wednesday as they show you the Step It Up technique where you start with a simple card then add to it to make it a little fancier & then add more or change it slightly to make it even better. This week's cards feature the super cute new stamp set Awesome Otters. One of the best things about it, after its cuteness, is the fact that you can get it for FREE when you order $90+ in the new Sale-A-Bration that is happening now. WOW!
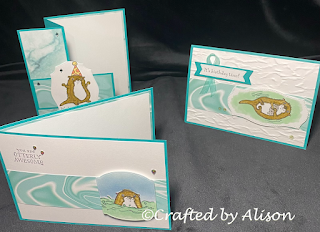
So let's start with the first, simpler card.

To create this simple card I used Bermuda Bay cardstock for the base, added a matte of Basic White then a strip of the free Simply Marbleous 6 x 6 DSP. I stamped the Otter in the water then coloured him in using Soft Suede, Pool Party & Just Jade Stampin' Blends & using the Colour Lifter pen also on his fur to give a smoother line where the two shades met. I used the masking technique to add the blue sky with a blending brush & Balmy blue. I die cut him using the Tasteful labels dies & mounted him over the water effect of the DSP. The sentiment is stamped directly onto the Basic White & I finished the card with just a couple of Garden Gems. There is also a matte of the DSP & Basic White inside with a little image to tie it all in.


 |
| Like raising the sentiment & adding a little bling behind it. |
 |
| And finishing it off with a sequin on his hat & some sparkly ribbon. And then I was happy! 😁 So that's all I have for you today. I hope you enjoyed yourself & come back next week. My Mid Week blog will be showing you a card sketch & how to make different cards using the same sketch. My Sunday blog will have all the details of how I created them. I hope you can join me for them. If you would like me to send you a catalogue please send me a message on my FaceBook page at Crafted by Alison. If you would like to order any of the materials I used in today's cards I've popped some links down below for you that go directly to my Stampin' Up shop. Not all items used are still current though. 😞 If you would like to buy any of the cards I show in my blogs they are available in my shop on FaceBook as well or you can message me to check if they are still available. Thanks so much for stopping by today. Til next time, take care & keep creating! XX Alison |


Comments
Post a Comment