Mid Week Blog #40 - Simplify or Step it up!
Hello & welcome to my Mid Week blog,
I am an independant Stampin' Up® demonstrator with a passion for creating. I have a regular weekly blog on a Sunday that explores different stamp sets, die sets or products sold by Stampin' Up® and my Mid Week blog explores tips, techniques, card sketches, colour challenges & lots of other ideas to help you make the most of your crafting time. There are ideas for 'just starting out' crafters, 'in-betweeners' and more avid crafters.
Today's post is all about making cards from easy-peasy to stepped up & fancy using the same design to begin with & adding to it in one or more steps.
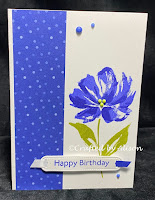
As I was looking to make a range of cards from super simple to fancy I chose the lovely Art Gallery stamp set as it can be used as a spotlight or be added to easily to make it more elaborate. As the new In Colours are so pretty I chose Starry Sky & Orchid Oasis for the bloom & added Pear Pizzazz for the greenery. The cardstock is Basic White & Starry Sky with some In Colour DSP to co-ordinate.
For the first card I simply stamped the image in the feature colours, adding the sentiment in Starry Sky & added some blue toned In Colour matte decorative dots. Done!
The intermediate card uses the same image but moved slightly to the right so that I could pop in a piece of In Colour DSP on the left. I added the same blue tone matte decorative dots again but also added a few green toned ones for the centre of the flower. The sentiment was diecut with the Waves dies & I threaded a piece of Starry Sky cardstock through one hole & some White Crinkled seam ribbon through the other end. This was mounted with some dimensionals & that was card number 2 done also.
The final card is a bit more fancy but uses all of the same elements as the previous cards but I also used a second floral stamp from Art Gallery to create some background detail on on of the layers. The card base is different too with Starry Sky instead of Basic White then the stamped layer of Basic White. I used the same DSP & Scalloped Contours dies to create the next layer with the final layer being Basic White. I stamped the same image on the Basic White then diecut with another of the Scalloped Contour dies. A second image was stamped & diecut & layered over using some dimensionals. The sentiment is diecut as per the previous card but attached to a small piece of scrap Starry Sky which happened to have the same scalloped edge as the frames. To finish I mounted the sentiment over the stem with dimensionals, adding some Rhinestone Waves basic jewels & sentiment as well as a little bow in the Crinkled seam ribbon.


Comments
Post a Comment