Posts

Showing posts from August, 2022

Mid Week blog #47 - Colouring directly onto stamps

Image
Hello & welcome to my Mid Week blog, I am an independant Stampin' Up® demonstrator with a passion for creating. I have a regular weekly blog on a Sunday that explores different stamp sets, die sets or products sold by Stampin' Up® and my Mid Week blog explores tips, techniques, card sketches, colour challenges & lots of other ideas to help you make the most of your crafting time. There are ideas for 'just starting out' crafters, 'in-betweeners' and more avid crafters.    This week's focus is how to colour directly onto your stamps using the Stampin' Write© markers. ( All the info I have read says to use the Stampin' Write© markers rather than the Stampin' Blends© as the blends are alcohol based which may damage your stamps.)  This type of colouring is a handy technique if you want to create with more than one colour & works really well with outline stamps but also looks good with solid image stamps. I've got a mixture of both to s...

Using embossing folders as the feature of a card - Thanks & Hello

Image
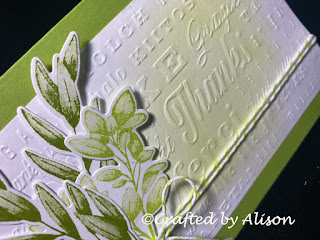
  Hello & welcome to my blog, My name is Alison & I am an independent Stampin' Up® demonstrator in Melbourne, Australia. I love creating cards & gifts for my loved ones & this blog will show you how to create something special for those you love. Today's blog is all about using embossing folders as the feature of a card. I hope you like what I've made! How gorgeous are the colours in this card? I've used just 2 tones for this card, green & white. Starting with a Granny Apple Green base I added a piece of Basic White which I embossed with the 'Thanks' embossing folder after blending some Parakeet Party ink in one area. I then stamped some leaves from the Forever Fern stamp set in Granny Apple Green & Parakeet Party before die cutting them with the Forever Flourishing dies. I wrapped some In Colour, Parakeet Party twine around the card twice. The leaves were adhered over the twine & embossing using glue dots. A simple bow was the finish...

Mid Week blog #46 - Faux Twisted Ribbon technique

Image
  Hello & welcome to my Mid Week blog, I am an independant Stampin' Up® demonstrator with a passion for creating. I have a regular weekly blog on a Sunday that explores different stamp sets, die sets or products sold by Stampin' Up® and my Mid Week blog explores tips, techniques, card sketches, colour challenges & lots of other ideas to help you make the most of your crafting time. There are ideas for 'just starting out' crafters, 'in-betweeners' and more avid crafters.  This week I look at a technique I saw in a Lisa Curcio Youtube video. Using DSP strips she created a faux twisted ribbon effect & I loved it so much I really wanted to give it a try. I hope you like it as much as I do. Here's the finished card & below are some instructions on how I made it. I cut Sweet Sorbet & Basic White cardstock along with Sweet Sorbet DSP as per the following picture.... and here's them again in case you can't see them very well.  Sweet Sorbe...

Case the catalogue - He's All That!

Image
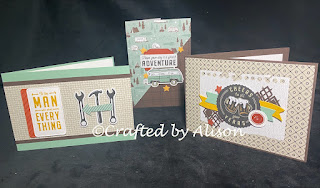
Hello & welcome to my blog, My name is Alison & I am an independent Stampin' Up® demonstrator in Melbourne, Australia. I love creating cards & gifts for my loved ones & this blog will show you how to create something special for those you love. Today's blog is all about CASE'ing the cards that the Stampin' Up® creative team  make to demonstrate the stamps & dies & other products that are featured in the catalogues. I hope you like what I've made! There are so many beautiful cards featured in each Stampin' Up® catalogue that occasionally I decide to CASE some of them. This week I will show you 3 cards inspired by the current Annual Catalogue. I will show you the catalogue card & my version. I thoroughly enjoyed creating these cards this week. When the new catalogue launched in May I had to have the He's The Man suite collection as it had Stamp Set, Dies, DSP (including 2 sheets of diecuts) & metallic dots. Using this suite plus...

Mid Week blog #45 Dutch Barn Door fancy fold

Image
 Hello & welcome to my Mid Week blog, I am an independant Stampin' Up® demonstrator with a passion for creating. I have a regular weekly blog on a Sunday that explores different stamp sets, die sets or products sold by Stampin' Up® and my Mid Week blog explores tips, techniques, card sketches, colour challenges & lots of other ideas to help you make the most of your crafting time. There are ideas for 'just starting out' crafters, 'in-betweeners' and more avid crafters.  In today's blog I will show you a fancy fold that is known as a Dutch barn door. This style of card is quite easy to make but gives a bit of WOW.  I love how easy it was to make this card & especially love the colour combinations. I'll now take you step by step through how I made it. Step 1. Cut the card base 22.8 x 10.5cm & score at 8cm.  Cut the 'flaps or doors' 21 x 8cm and score at 5.2 & 15.8cm. Step 2. Adhere the flap piece behind the card base ensuring th...

Tic Tac Toe challenge #174

Image
Hello & welcome to my blog, My name is Alison & I am an independent Stampin' Up® demonstrator in Melbourne, Australia. I love creating cards & gifts for my loved ones & this blog will show you how to create something special for those you love. Today's blog is all about making a card using a Tic Tac Toe themed challenge. Using the grid below I looked back over my creations & found a very special card I had made for a workmate to give to his niece. I would normally make a new card but this week has been rather challenging with my Mum being hospitalised. We weren't sure whether she'd make it but with lots of fluids & exceptional care from the staff at her nursing home she looks to be on the mend. I hope you understand & I hope you like what I've got to show you! This is the current Tic Tac Toe challenge, No. 74, that the card is based on. The principle of the challenge is there are 3 columns & 3 rows with a different focus in each squar...