

Mid Week blog #49 - Partial diecut card technique - part 1.
Hello & welcome to my Mid Week blog,
I am an independant Stampin' Up® demonstrator with a passion for creating. I have a regular weekly blog on a Sunday that explores different stamp sets, die sets or products sold by Stampin' Up® and my Mid Week blog explores tips, techniques, card sketches, colour challenges & lots of other ideas to help you make the most of your crafting time. There are ideas for 'just starting out' crafters, 'in-betweeners' and more avid crafters.
This week is part of a series that looks at using dies slightly differently. I will show you how to make partial diecut cards. It's really quite easy & allows you to change the look of your cards & get more out of your dies. I used a new stamp & die bundle - Sweet Candy Canes - from the July - December Mini catalogue as the die has diagonal lines that can be used to show DSP peeking through underneath.
First I'll show you a pic of the finished card then I'll walk you through how I made it.


Step 2 - Using the usual sandwich combination of base (#1), diecutting plate (#2), first clear plate (#3), cardstock with die then second clear plate (#3). The trick is to place it only on the area that you want cut.
Step 3 - Run the sandwich through the machine. The machine will only cut where the top plate covers the die.


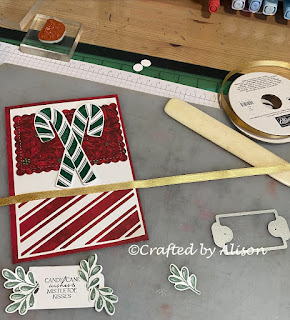 To create the complete card I first wrapped some Gold Shimmer ribbon across the centre of the card. I then attached the DSP & diecut onto Evening Evergreen cardstock. To decorate the front I used Scalloped Contours dies & the reverse of the same DSP to create a matte. The candy canes were stamped in Shaded Spruce & the Mistletoe leaves were stamped in Soft Succulent. For the sentiment tag I used Memento black ink on the tag die before adding some mistletoe to the holes & mounting with dimensionals. A couple more mistletoe sprigs were added just under the ribbon & in between the two candy canes.

The bling is newly released Adhesive backed sequins & gems while the mistletoe flowers were made with some white Classic Matte dots.


This is how the cardstock comes out of the machine. As the die I used gives a diagonal cutout finish all I needed to do was use a craft knife & ruler to carefully cut the areas that were incomplete. The photo on the right shows some of the pieces that come out easily and the following photo shows the final piece glued down with DSP showing underneath.


So that's it for the first example of partial diecutting. I have a some more ways to use partial diecutting which I will show you in future posts. My next post will be on Sunday & shows you how to use the Biggest Wishes stamp set as a background stamp. Next week's Mid Week blog will use another card sketch. I hope you can join me for both of them.
Thanks so much for popping in to read my blog. Til next time, take care & keep creating!
XX Alison


Comments
Post a Comment