Posts

Showing posts from October, 2022

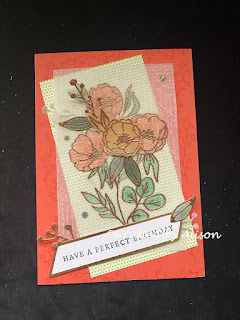
Colouring on Vellum to create a delicate Fresh Cut Flowers bouquet.
Image
 Hello & welcome to my blog, My name is Alison & I am an independent Stampin' Up® demonstrator in Melbourne, Australia. I love creating cards & gifts for my loved ones & this blog will show you how to create some beautiful cards using the Fresh Cut Flowers stamp set, Stampin' Blends markers & vellum. I love this card! I used the sample on page 65 of Stampin' Up's Annual Catalogue as inspiration but tweaked it to 'make it my own'. Here are the steps I took to create it. Step 1: Using versamark I stamped the large bouquet from the stamp set onto a piece of Vellum Layering designs vellum & applied copper embossing powder. That's when I found that the centre of the stamp hadn't taken the versamark properly! Step 2: Using a heat gun I turned the powder into gleaming copper! Step 3: I started to colour in the bouquet...... Step 4: Using Calypso Coral, Daffodil Delight & Shaded Spruce Stampin' Blends® I finished all of the colour...

Mid Week Blog #55. Funfold with a secret pocket for gift cards.

Image
 Hello & welcome to my blog, My name is Alison & I am an independent Stampin' Up® demonstrator in Melbourne, Australia. I love creating cards & gifts for my loved ones & this blog will show you how to create something special for those you love. Today's blog shows you a fun fold that holds a gift card inside - perfect for birthdays, Christmas, weddings or any occasion when you want to give a little gift. I was inspired by a post I saw by a post I saw by a French demonstrator, Ludi' Bulles & Creations. I've created two different versions, one portrait & one landscape & one for Christmas & one for a male. Here are the cutting dimensions for the Christmas card. I used the Trimming the Tree stamp set & Tree Trimming dies for the images & sentiment & the Deckled Rectangle dies for the Very Vanilla pieces. Main cardstock (Pretty Peacock)  -14.85 x 21cm for the main card base & 7 x 21cm for the inner card base. Score the main car...

Floral creations with Blessings of Home

Image
 Hello & welcome to my blog, My name is Alison & I am an independent Stampin' Up® demonstrator in Melbourne, Australia. I love creating cards & gifts for my loved ones & this blog will show you how to create some beautiful cards using the Blessings of Home stamp set. I've created 2 very different cards for you this week. One uses blending & layered stamping, the other uses heat embossing on metallic cardstock with fussy cutting.   I diecut a piece of white cardstock using the Deckled Rectangles dies & blended Sweet Sorbet, Orchid Oasis, Starry Sky & Garden Green. Over that I stamped the large bouquet from Blessings of Home in Memento after placing it on another piece of Basic White. The plain white piece was adhered to a Kraft card base & the blended piece was layered over that with dimensionals. A sentiment from the same stamp set was stamped in Memento black on Kraft card & layered it over the blended piece. The bling is from the July to D...

Mid Week Blog #54 - Case the Catalogue

Image
 Hello & welcome to my blog, My name is Alison & I am an independent Stampin' Up® demonstrator in Melbourne, Australia. I love creating cards & gifts for my loved ones & this blog will show you how to create something special for those you love. Today's blog showcases the creations of the artists at Stampin' Up from the July - December '22 Mini Catalogue. There are 2 cards today that are shown on page 10 of the catalogue & will help you add to your Christmas card stash. Here's a pic from the catalogue of the original cards to compare to my cards.  I chose the top left & bottom card to CASE & love how they turned out. There's not much difference, just slight placement variance, a little extra bling & a longer label for the sentiment on the Real Red card.   These cute cards were created with the Sweet Candy Canes stamp set & Candy Canes dies which also come bundled to help you save 10%. I added some Real Red Glimmer Paper, Gold ...

Beautiful creations are easy with Best Butterflies

Image
 Hello & welcome to my blog, My name is Alison & I am an independent Stampin' Up® demonstrator in Melbourne, Australia. I love creating cards & gifts for my loved ones & this blog will show you how to create something special for those you love. Today's blog features beautiful butterflies thanks to the Best Butterflies stamp set & Build A Butterfly dies.  The first card was created during a crafting session with Nancy from Nancy's Nifty Notes. Nancy holds a free crafting session each month with the theme of Mystery Stamping. It's loads of fun to create with others & keeps the brain cells active too. With Night of Navy for the base the card is 14.9 x 21cm & scored at 4cm & 14.5cm. There are 4 pieces of Butterfly Kisses DSP, 2 on the front & 2 on the inside. 2 pieces measure 3.5 x 14.4cm & the other 2 are 6 x 14.4cm. I alternated the patterns so that there was one of each design on the front & inside but others chose to have one...

Mid Week blog #53 - Flower Pot fancy fold

Image
 Hello & welcome to my blog, My name is Alison & I am an independent Stampin' Up® demonstrator in Melbourne, Australia. I love creating cards & gifts for my loved ones & this blog will show you how to create something special for those you love. Today's blog is a fun fold that looks just like a pot full of flowers! It's basically an easel fold but the difference is that the piece that props up is shaped like a flower pot. I've taken pictures of the steps I took during the making of the card as well as the finished result. I hope you like it. Step 1. Measurements & scoring instructions for the base & first matte. Step 2. Measurements for the flower pot & second matte. Step 3. The flower pot pieces have been embossed with the Old World Paper folder. The large bloom has been stamped in Daffodil Delight & Pumpkin Pie & the small & large leaves are stamped in Pear Pizzazz. Step 4. The base of the pot has a small score so that it can fo...

Artistically Inked Christmas

Image
 Hello & welcome to my blog, My name is Alison & I am an independent Stampin' Up® demonstrator in Melbourne, Australia. I love creating cards & gifts for my loved ones & this blog will show you how to create something special for those you love. Today's blog is all about using regular stamp sets to create Christmas cards. To make this week's creations I've taken the beautiful Artistically Inked stamp set & tweaked it to design a  card & a gift box for the Christmas season. I hope you enjoy what I've created!   Now the Artistically Inked stamp set is a beautiful stamp set which can help you make some gorgeous creations but who would have thought that this beautiful floral set could also be used to make Christmas themed creations? I think that the leaves of this set make a lovely wreath & I've created 2 similar but different colour ways to show you the versatility of this set. To create the card I started with a Garden Green card base t...