Hello & welcome to my blog,
My name is Alison & I am an independent Stampin' Up® demonstrator in Melbourne, Australia. I love creating cards & gifts for my loved ones & this blog will show you how to create some beautiful cards using the Fresh Cut Flowers stamp set, Stampin' Blends markers & vellum.

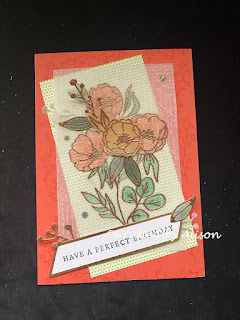
I love this card! I used the sample on page 65 of Stampin' Up's Annual Catalogue as inspiration but tweaked it to 'make it my own'. Here are the steps I took to create it.
Step 1: Using versamark I stamped the large bouquet from the stamp set onto a piece of Vellum Layering designs vellum & applied copper embossing powder. That's when I found that the centre of the stamp hadn't taken the versamark properly!
Step 2: Using a heat gun I turned the powder into gleaming copper!
Step 3: I started to colour in the bouquet......
Step 4: Using Calypso Coral, Daffodil Delight & Shaded Spruce Stampin' Blends® I finished all of the colouring on the reverse of the vellum.
The next step was to stamp a small image on the front of the Calypso Coral card in the same colour. I cut a small piece of Butterfly Kisses DSP to pop behind the vellum. Next I heat embossed one of the blooms on Pale Papaya Shimmer Vellum along with some leaves cut from Soft Succulent & Evening Evergreen Shimmer Vellum using the Fresh Cut Stems dies. The cutout sections of the leaves were adhered on the reverse side to the frame of the leaf which I had diecut from Bronze Metallic cardstock. This meant that they matched what I had embossed & coloured on the main bouquet. The trick when adhering vellum is to apply the adhesive in areas that won't show. I find that mini glue dots work great when placed behind stamped images, embellishments or sentiments. A couple of sprigs diecut from copper & vellum were also added.


To finish off the card I stamped a sentiment from Blessings of Home & backed it with some Copper cardstock with a few sprigs & leaves as well. The very last thing I added were some 2021-23 In Colour gems. These last two photos show you the different layers of the bouquet. The DSP & vellum were angled just a little bit to give it a whimsical effect.
That's it for another week. Thanks so much for stopping by. I hope you can join me again on Wednesday for my Mid Week blog. This week I will show you a stamping technique with a difference using baby wipes. In next Sunday's blog I will be stamping with the Pansy Patch stamp set, a really beautiful set. I hope you can join me for both of those.
If you would like to order any of the supplies I used today you can head over to my
Stampin' Up® shop using the links below.
If you would like to purchase any of the cards I feature in my blogs they can be found in my FaceBook shop at craftedbyalison.
If you would like me to send you a catalogue then please message me via my FaceBook page, Crafted by Alison or send me an email at craftedbyalison@gmail.com.
Thanks for stopping by, til next time, take care & keep creating! XX Alison


Comments
Post a Comment