Mid Week blog #53 - Flower Pot fancy fold

 Hello & welcome to my blog,

My name is Alison & I am an independent Stampin' Up® demonstrator in Melbourne, Australia. I love creating cards & gifts for my loved ones & this blog will show you how to create something special for those you love. Today's blog is a fun fold that looks just like a pot full of flowers! It's basically an easel fold but the difference is that the piece that props up is shaped like a flower pot. I've taken pictures of the steps I took during the making of the card as well as the finished result. I hope you like it.

Step 1. Measurements & scoring instructions for the base & first matte.

Step 2. Measurements for the flower pot & second matte.

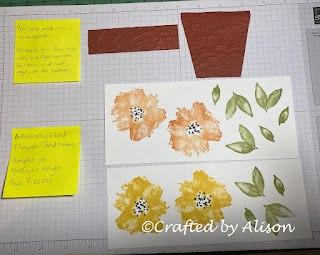
Step 3. The flower pot pieces have been embossed with the Old World Paper folder. The large bloom has been stamped in Daffodil Delight & Pumpkin Pie & the small & large leaves are stamped in Pear Pizzazz.

Step 4. The base of the pot has a small score so that it can fold down when the card is closed but the rim is attached to the top flap. The flower pot assembled, flowers & leaves die cut & Basic White matting attached. I also stamped the top flap of the card prior to attaching the rim of the pot.


I then stamped a sentiment from Special Moments, diecut it with Stiched Shapes & matted it on Pear Pizzazz, also diecut with Stitched Shapes. The sentiment was raised on dimensionals & some of the spare leaves were adhered underneath.

 
The flowers & leaves were attached to the top flap, allowing room for the card to fit into an envelope.

As the top of the card has a few layers I added an extra piece to the pot base & a small tag that slips under the sentiment. This allows more stability when the card is opened.


This is the when I had finished all of the steps. But I thought it wasn't quite right, so ......


I added matting to the inside flap & some twine around the front of the pot. Then I was happy! 🤣
If you would like more info on materials used or how I assembled the card then please drop my a line on Facebook at CraftedbyAlison or email me at craftedbyalison@gmail.com.

That's it for this post. Thanks for stopping by. My next blog is on Sunday & features some beautiful cards created with the Best Butterflies stamps & Build a Butterfly dies. In next week's Mid Week blog I will be CASEing the catalogue. I hope you can join me for both of those. 
Til next time, take care & keep creating! XX Alison


Comments

Popular posts

Diagonal Split Front fun fold cards

Midweek blog #140 - Rustic Christmas kit alternatives Pt2

Using Layering Leaves stamp set for simple, elegant Christmas cards

Midweek blog#141 - Make your own gift tags

Fancy a little bit of cake? Creations with the Cake Fancy stamp set