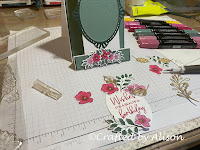
Mid Week blog #58 - Fancy fold - step card
Hello & welcome to my blog,
My name is Alison & I am an independent Stampin' Up® demonstrator in Melbourne, Australia. I love creating cards & gifts for my loved ones & this blog will show you how to create something special for those you love. Today's blog shows you how to create a fun fold step card without having to make cuts in the base card. Traditional step cards can be a little daunting when you are first starting out with fun folds so today's card takes away some of the anxiety by replacing the cutting step with the addition of a panel to create a 'faux' step card. I hope you enjoy this technique.
To create this card you will need:
Framed Florets stamp set & dies
Main colour cardstock - Basic White - 10.5cm x 29.7cm & 9.5cm x 11.4cm plus some for stamping your images.
Contrasting cardstock - Evening Evergreen - 10.1cm x 12cm (two pieces) & 10.1cm x 2.1cm.
DSP & Specialty papers - Festive Foils DSP - 9.8cm x 11.7cm (two pieces) & 9.8cm x 1.8cm
Gold & Rose gold Metallic Specialty paper for diecutting
Inks - Tuxedo Black Memento Ink, Evening Evergreen & Magenta Madness
Stampin' Blends® - Light & Dark Rococo Rose, Light Evening Evergreen, Dark Soft Succulent, Light & Dark Melon Mambo & Dark Daffodil Delight.
Instructions:
Step 1: Score & burnish the Basic White card base at 12.3cm, 24.6 & 27.1cm. Crisp lines are needed to help the easel card stand nicely.
Step 2: Score & burnish the Basic White centre strip at 7.5cm.
Step 3: Attach one of the 9.8cm x 11.8cm Festive Foils DSP to one of the 10.1cm x 12cm Evening Evergreen mattes & adhere to the inside front that is behind the stepped folds.
Step 4: Attach the Basic White centre strip to the front step then attach some glue dots to the outside areas that remain. Adhere the smallest Evening Evergreen & DSP strips to the front step, covering the white centre strip.
Step 5: Apply glue to the folded end of the centre strip, ensuring that you only apply it where it will contact the base of the card. Reverse the whole card & press this piece down to the back of the card base. When opened it will look like a regular step fold card.
Step 6: Diecut the oval frame from Evening Evergreen & DSP. You will only need the frame of the Evening Evergreen & the inside of the DSP for this card. Put the other pieces aside for another card.
Step 7: Attach the green frame to the centre strip of the card.
Step 8: Stamp the floral images onto the Basic White stamping piece & colour the flowers & leaves before diecutting them.
Step 9: Stamp the sentiment in Magenta Madness & diecut using this die
Reserve the outer edge of the frame for another card.
Step 10: Attach the floral spray to the front step of the card.
Step 11: Diecut some foliage from Gold metallic specialty paper. You can leave some parts of the leaves in if you wish or discard all.
Step 12: Decorate the framed sentiment with the flowers & leaves as you wish, reserving some for the reverse of the card. Attach to the green frames on the card with dimensionals.
Step 13: Optional step: Turn the card over. Using the remaining stamped floral images, decorate around the centre strip where it is glued to the back of the card. Stamp an additional sentiment on the back of the card if desired.
Step 13: Stamp some small images on the 9.5cm x 11.4cm piece of Basic White.
Step 14: Adhere the stamped piece of Basic White to the 10.1cm x 12cm piece of Evening Evergreen & Festive Foils DSP mattes & adhere this to the inside of the card.
Step 15: Stamp some images onto an envelope. You are finished!


Comments
Post a Comment