Mid Week blog #62. Using alcohol markers to colour DSP
Hello & welcome to my blog,
My name is Alison & I am an independent Stampin' Up® demonstrator in Melbourne, Australia. I love creating cards & gifts for my loved ones & this blog will show you how to create something special for those you love. Today's blog shows you how to use DSP & alcohol markers to create some beautiful cards. I hope you enjoy this quick & easy way to get more out of your DSP. In last week's mid week blog I mentioned that I would be featuring the Stamparatus but I was asked create some gift card holders & decided to bump up a future blog post to this week instead.
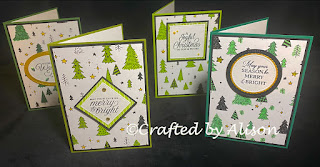
Here are 4 cards I created from one sheet of Celebrate Everything DSP. I used a variety of different green Stampin' Blends & Stampin' Write markers to give you an idea of the different kinds of effects you can create. Here's the paper before it was coloured.....
I simply cut it into 4 card front sizes then set to work with the colours.
The greens for the trees are Shaded Spruce, Call me Clover, Granny Apple Green & Parakeet Party. For the stars I used Pineapple Punch, Bumblebee & Daffodil Delight.
As I mentioned earlier I was asked to create some gift card holders for a friend so decided this paper was perfect for for them. Once the paper was finished I matted them all with Basic Black then mounted them on Garden Green, Pear Pizazz & Granny Apple Green. The sentiments were stamped, diecut with different shapes from the Stitched Shapes dies, matted with matching DSP or gold & black added to some. These were then added to the card front.
When cutting the card bases I had cut them longer, scored at 10.5cm & 21cm then cut away a piece from the top to half way on the remaining flap. I added an extra 1mm scoreline to give a little room for the gift card when it was added. I stamped a couple of Christmas trees on some Basic White mattes & blended matching inks on the left, just above the pocket.
A small piece of uncoloured DSP was added to the pocket & a sentiment was stamped then diecut for the inside. I experimented with the adhesives for the pockets. First I tried white glue, then some stretched out glue dots & finally decided that some strips of Dimensionals was ideal.


Comments
Post a Comment