Hello, welcome to my blog,
My name is Alison & I am an independent Stampin' Up® demonstrator in Melbourne, Australia. I love creating cards & gifts for my loved ones & this blog will show you how to create something special for those you love. If this is your first time here, thanks for visiting, I hope you enjoy what I have to share with you. If you're a returning visitor, thank you so much for supporting me! 😍
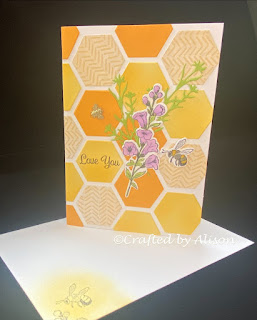
Today's blog features a card using the beautiful Honeybee Home stamp set. It is based on a card from the annual catalogue (pg74) & has a honeycomb design which I really love. I hope you like it too.
Here is my finished card...

...and here is a comparison of mine next to the the Stampin' Up catalogue version.

Isn't it lovely? To create this card I started with some Basic White & Mango Melody cardstock plus some Happy Forest Friends DSP.
I chose Honeybee Home stamps along with the matching Honeybee Blooms dies & a brand new die set to my craft room called Beautiful Shapes. It's a really versatile die set as it can be used for sentiment mattes, geometric designs or for card sketches. Love it! Getting back to prepping the card though.
I cut strips of Basic White, Mango Melody & the DSP just wide enough for the die size I chose.
On one BW strip I stamped the floral image & some bees, on the other one I used blending brushes with Mango Melody to create some soft colour. These were then run through the embossing machine to give me a whole bundle of shapes to work with. I coloured the floral image & bees with Granny Apple Green, Fresh Freesia, Daffodil Delight, Crushed Curry, Smoky Slate & SU800, one of the skin tone colours in the Stampin' Blends. I also diecut some greenery in Granny Apple Green as well.
I started the pattern from the left hand size of the card, adding rows across & then added in pieces to the edge of the card. The pattern was created based purely on what I thought looked good. I chose to turn the patterned DSP to give a little bit more of a fun look. I chose a small sentiment from the Plentiful Plants stamp set & stamped it on one of the hexagons before adding the flowers & greenery, the coloured bee plus a brushed brass bee embellishment.
I added a little bit of blending, part of a plant plus a bee to the inside of the card & envelope & the card is finished!
Here's a more detailed pic of the front of the card.
I loved creating with the this stamp set, yet again, & hope you've enjoyed this too.
That's it for another week. Thanks so much for stopping by. If you would like to order any of the supplies I used today you can head over to my
Stampin' Up® shop using the links below. Please note that there are some supplies I used this week that are not available any more as they are retired stock. That doesn't mean you can't recreate your own version of these cards though! Just swap out the retired items for whatever you have in your stash.
I hope you have enjoyed my creations today & can join me again on Wednesday when I will show you a fun fold I created for a card swap I'm participating in with my crafting group. On Sunday I will be showing you the Something Fancy stamps & dies from the new Mini catalogue. It features loads of sentiments in the stamp set & label shapes in the dies. Another very useful bundle. I hope you can join me for both of them.
Don't forget that new mini catalogue went live on the 5th January & coincides with the release of the latest Sale-a-bration promotion. Both are full of gorgeous new products including a whopping 48 sheets of DSP in one of the free packs in the Sale-a-bration catalogue! The sale-a-bration catalogue is only available until the end of February so if you want some freebies then you'd better be quick!
If you would like to purchase any of my creations that I feature in my blogs they can be found in my FaceBook shop at craftedbyalison or you can or order something unique.
If you would like me to send you a Mini catalogue or the Annual catalogue then please message me via my FaceBook page, Crafted by Alison or send me an email at craftedbyalison@gmail.com.
Thanks for stopping by, til next time, take care & keep creating! XX Alison


Comments
Post a Comment