Hello & welcome to my blog,
My name is Alison & I am an independent Stampin' Up® demonstrator in Melbourne, Australia. I love creating cards & gifts for my loved ones & this blog will show you how to create something special for those you love. I blog twice a week, once on a Sunday where I mainly showcase a stamp set or dies & sometimes special DSP. My second blog is mid week on a Wednesday where I look at techniques, colour challenges, card sketches, fun folds, tools & equipment & ways to make or improve your projects. That's what this blog is about.
Today I have a lovely technique for you that uses up scraps & strips. I created 2 cards with different starburst designs & with the leftover scraps from one of the cards I made a 'scrappy strips' card matte. Here are the two finished cards...
I think they are lovely. And both made with scraps. Perfect.
Here are some pictures of the process I used to create the cards.
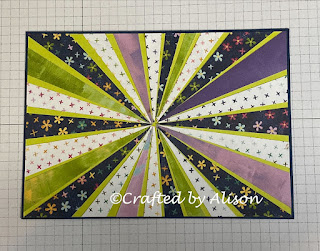
Gather together some strips that work well together. I chose Hues of Happiness DSP.
Cut them into strips roughly 3cm x 8cm, they just need to be long enough to overhang the card when glued down. Place them diagonally on the trimmer & cut them into wedges.
I then used a Lemon Lime Twist matte so that the pretty green could peak through behind the strips.
The strips were arranged so that there was a pattern, which I prefered to a random design.
The matte was turned over & trimmed. This left some pieces big enough to use on a scrappy strip card which I will show you later in the blog. Here's the matte mounted on a Night of Navy layer.
The next starburst I created was smaller & used scraps from the 2022-24 In Colour DSP. It was matted on Basic White with no colour showing through. This was added to a Starry Sky layer.
Here are the two designs ready to be made into cards.
Here's the large design as a finished card.
I added a Circle Sayings sentiment & image with some Soft Sea Foam ribbon behind it. This was raised with dimensionals.
Here's the small design as a finished card.
This was the simplest of the two. I simply adhered the design directly to the card front, add a Starry Sky sentiment from Framed Florets, some 2022-24 In Colour matte decorative dots & the card was complete.
Lastly, here is the scrappy strip matte that I created with some of the leftovers from the larger design.

I used Lemon Lime Twist, Daffodil Delight & Fresh Freesia to break up the DSP.
This will be made into a card another time.
That's it for this week. My next blog is on Sunday featuring a 3D creation. Next week's mid week blog will feature some more CASE'd cards from the new catalogue.
I hope you can join me for both of them. Til next time, take care & keep creating!


Comments
Post a Comment