Hello & welcome to my blog,
My name is Alison & I am an independent Stampin' Up® demonstrator in Melbourne, Australia. I love creating cards & gifts for my loved ones & this blog will show you how to create something special for those you love. I blog twice a week, once on a Sunday where I mainly showcase a stamp set or dies & sometimes special DSP. My second blog is mid week on a Wednesday where I look at techniques, colour challenges, card sketches, fun folds, tools & equipment & ways to make or improve your projects. That's what this blog is about.
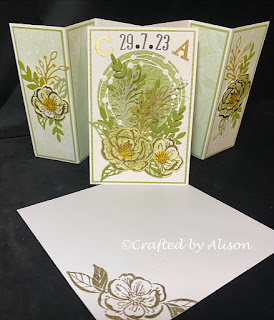
This week I have a gorgeous card to share with you that was made for a wedding my daughter was Maid of Honour in. As it was a special occasion I wanted it to have some WOW factor so thought a funfold with a difference would be just right. I was so happy with the result & my daughter loved it too. They've all jetted off to Bali for a honeymoon/birthday celebration, lucky ducks!
Here is the creation with matching envelope...
This card looks a little daunting at first but is quite easy to put together once you know how. The decoration took most of the time during it's making.
To create one of your own you will need the following supplies...
1. Basic White cardstock -
2 pieces measuring 29.7cm x 14.8cm & scored at 5.5cm, 13.7cm & 24.2cm. These two pieces form the base of the card where the 'wings' are.
The scores were then folded & burnished so that there was a mountain, valley & valley fold for both sides of the card.
In order for there to be a card in the centre of the project I cut another piece of Basic White measuring 10cm x 14.8cm. The two winged sides were positioned with the mountain fold to the outside. This made the 2nd valley folds, when put together, form a platform for the centre card. I cheated a little with some sticky tape to hold the inside flaps together before adding the centre card which measures 10cm x 29.7, scored in half.
To decorate I used the following measurements:
Mattes in Pear Pizzazz - 2 pieces 14.3cm x 5.5cm for the outside wings
2 pieces of 14.3cm x 4.5cm for the inside fold next to them
2 pieces of Pear Pizzazz measuring 14.3cm x 9.5cm, one for the inside of the card, 1 for the front of the card.
2 pieces of Basic White measuring 13.8cm x 9cm for the inside matte & the 2nd matte for the front of the card.
To decorate the front of the card I embossed the Pear Pizzazz matte with the Basics 3D embossing folder & diecut the Basic White matte with the Irresistible Blooms dies to create the window frame. I heat embossed some gold Irresistible Blooms flowers then added a variety of leaves & foliage in gold foil, Old Olive, Pear Pizzazz & vellum.
The next step was to heat emboss the initials of the bride & groom in gold on the front of the card along with the envelope. I added the wedding date as well in Memento Black. Matte Black dots were added between the day & month to seperate them.
The inside of the card front has a DSP matte matching the the DSP on one of the wings. It also has a matte for the sentiment diecut in Pear Pizzazz using the retired Detailed Bands dies. The second sentiment was stamped directly onto the Basic White Matte along with more blooms & leaves in gold embossing.
You may notice that the second photo in this post looks a little different to the photo above? That is because after I had finished the card I sent a pic of it to my daughter & she said "Mum the groom's name is El, not Al"! I thought I'd heard her call him Al everytime she'd mentioned him but apparently not!
So, I had to do some card surgery! I heat embossed 'C' & 'E' in cold onto some Pear Pizzazz scraps & then diecut some hearts around the initials. These were adhered with a double layer of glue dots directly over the original initials. I think it works. She loved it, the couple loved it and the bride's family loved it so everyone's happy. 😁
Thanks again for your understanding with the delay in posting & for joining me. I hope you enjoyed this funfold & will try this yourself. If you do I would love for you to post a pic on my Facebook page, craftedbyalison.
That's it for this week. I hope to post my next blog on Sunday featuring some quick & easy cards using the Something Fancy stamps & co-ordinating dies. My sister is comfortable in palliative care & we are taking each day as it comes as we don't know how long we have left with her. As you can imagine, this is a very stressful & busy time for us all so if future posts are delayed or missing then please understand why.
Next week's mid week blog will feature some fun gifts I made for the staff at my Mum's nursing home for Aged Care appreciation day as long as my sister's health holds up.
I hope you can join me for both of them. Til next time, take care & keep creating!
XX Alison


Comments
Post a Comment