Hello & welcome to my blog,
My name is Alison & I am an independent Stampin' Up® demonstrator in Melbourne, Australia. I love creating cards & gifts for my loved ones & this blog will show you how to create something special for those you love. I blog twice a week, once on a Sunday where I mainly showcase a stamp set or dies & sometimes special DSP. My second blog is mid week on a Wednesday where I look at techniques, colour challenges, card sketches, fun folds, tools & equipment & ways to make or improve your projects. That's what this blog is about.
In this week's blog I'm CASEing some of the cards from the new Mini catalogue that went live on the 4th January. There's a gorgeous suite called Perennial Lavender which has 2 stamp & die bundles along with DSP, paper diecut butterflies & pretty glimmer gems. The creative people at Stampin' Up® have used these products to create some stunning cards & 3D projects. I've selected 3 cards to replicate for you.
Before I show you my CASE'd cards, here's the samples from the catalogue...
I chose the field of flowers in the top right, lavender & postage stamp card below it & the lavender field & butterfly to the left of it.
Here are my CASE'd cards...
I'll start with the lavender & postage stamp card.
The base & matte are Fresh Freesia. The matte is diecut with one of the Perennial Postage dies then the edges are brushed with Versamark. The sentiment is stamped in Gorgeous Grape using the Perennial Postage stamp set. This plus 2 pieces of DSP are diecut with different sized postage stamp dies. Before adhering the matte I used the postmark die, pressed into the Gorgeous Grape ink pad & run through the Stamp 'n' Emboss machine to leave a coloured impression.
I then stamped the blooms in Highland Heather & Gorgeous Grape while the stalks are stamped in Shaded Spruce. I fussy cut them as the dies from the Painted Lavender dies cut them as two pieces & I wanted one whole image. I raised them on dimensionals for some depth.
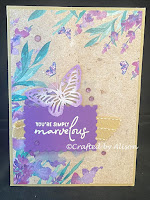
The next card was super easy. I used more of the DSP as a matte on a Crumb Cake base. I used 2 sizes for the postage stamp pieces, a vellum piece behind the sentiment which was heat embossed in white on Highland Heather. The butterfly wings were coloured with some Fresh Freesia using the Sponge Daubers. Before adhering the sentiment to the card I attached a piece of Burlap ribbon behind it. The card was finished with some Purple Glimmer gems.


For the final card I started with a Lost Lagoon base. I stamped the field of lavender by colouring directly onto the stamp with Stampin' Write markers & 'huffing' onto the stamp. Over this I adhered a strip of DSP. The sentiment uses a square postage die & is stamped in Shaded Spruce on Crumb Cake. It has a piece of Pecan Pie centre stripe ribbon attached behind. The field of butterflies were stamped directly onto the matte using Fresh Freesia, Gorgeous Grape & Highland Heather, some were first stamp, some second stamp. The large butterfly on the sentiment was sponged in Fresh Freesia with daubers. To create the little silver spots I used the Silver Enamel Effects paints, dropping small drops onto my silicone mat & allowing them to dry completely before adhering them.
As you can see, my copies are similar to the originals but I've tweaked them a little to 'make them my own'.
I hope you enjoyed this post & will try CASEing yourself. If you do I would love for you to post a pic on my Facebook page, craftedbyalison.
That's it for this week. I hope to post my next blog on Sunday featuring some cute creations using the Supremely Awesome stamp set.
Next week's mid week blog will feature a quick & easy technique called Patchwork Border which uses DSP as the main feature of the card.
I hope you can join me for both of them. Til next time, take care & keep creating!
XX Alison


Comments
Post a Comment