Hello & welcome to my blog,
My name is Alison & I am an independent Stampin' Up® demonstrator in Melbourne, Australia. I love creating cards & gifts for my loved ones & this blog will show you how to create something special for those you love. I blog twice a week, once on a Sunday where I mainly showcase a stamp set or dies & sometimes special DSP. My second blog is mid week on a Wednesday where I look at techniques, colour challenges, card sketches, fun folds, tools & equipment & ways to make or improve your projects. That's what this blog is about.
Today I am sharing how to heat emboss on vellum. It's quite a simple technique but as you're working with a thin material & heat, you do need to be careful. Here are some pics & the steps I used to achieve this beautiful card front.
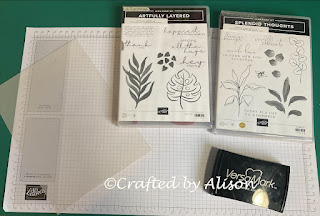
I decided that I wanted an open image rather than a filled in one. This would allow me to colour the back of the image with Stampin' Blends if I wanted to & achieve a stained glass finish. The stamp sets I chose were Artfully Layered & Splendid Thoughts as they both had large open leaf images.
Next I assembled my supplies - blocks for the three chosen images, Versamark to stamp with, plain paper to catch any ink when stamping off the edges of the vellum, an embossing buddy (not shown in this pic), embossing tray & Copper embossing powder.
One of the most important steps when embossing is to dust the area you want to emboss with an embossing buddy. This is a little parcel of material that is filled with a fine powder, similar to talcum powder. Doing this before stamping removes any oils from the surface so that the powder only sticks to where the versamark is stamped.
After stamping all the images I wanted, I covered the entire area of the vellum with the Copper embossing powder, flicking the back of the vellum gently to remove any excess powder.
Using the heat tool on the high setting I gently heated the powder until the matte finish became shiny - the indication that the embossing process is complete. A word of caution though, I used the Stampin' Up Heat tool which has a lower power than a previous heat tool I used to use. If I had been using the old heat tool I would have taken more time when heating the powder to ensure that the vellum did not overheat or melt.
Here is the finished sheet with some Lemon Lime Twist cardstock behind it. I chose this colour because the it's brightness pops nicely behind the muted vellum.
I chose not to colour behind the images this time to focus on the copper embossing but here's a pic of a previous creation on a Window Sheet where I did colour behind the image which was stamped in Stazon black rather than embossed, but I think you should get the idea.
I loved creating with this technique. It is such a pretty result with a WOW factor. I hope you enjoyed seeing my creation too.
That's it for this week's blog. I hope you enjoyed this unique way of creating. If you decide to give it a try I would love to see your creations so please feel free to pop over to my facebook page at craftebyalison & share your pics. My next blog is on Sunday & I will showcase a lovely bundle called Timeless Arrangements then my next mid week blog is a Colour Challenge. I hope you can join me for both of them.
Til next time, take care & keep creating! XX Alison


Comments
Post a Comment