Hello & welcome to my blog,
My name is Alison & I am an independent Stampin' Up® demonstrator in Melbourne, Australia. I love creating cards & gifts for my loved ones & this blog will show you how to create something special for those you love. I blog twice a week, once on a Sunday where I mainly showcase a stamp set or dies & sometimes special DSP. My second blog is mid week on a Wednesday where I look at techniques, colour challenges, card sketches, fun folds, tools & equipment & ways to make or improve your projects. That's what this blog is about.
This week I explored using embossing paste on my projects. It's not a medium I have used before so I was learning 'on the fly'! I must say, it's a very therapeutic, relaxing way to craft. I generally emboss using either an embossing folder or Versamark & embossing powders but Stampin' Up® also sell embossing paste & I have seen many posts from other crafters & decided to try something new. Here's what I created...
Now, the first pic doesn't look like much but it will be used as a background matte on a card for Sunday's blog. It was created by simply spreading some Embossing Paste across Old Olive cardstock & allowed to dry.
The second picture shows a beautiful pattern created by spreading Shimmery White Embossing Paste over a mask & allowing it to dry completely. Now here are some quick tips on how to use the pastes,
I started with the cardstock, a tub of Embossing Paste & the Palette Knives available from Stampin' Up®.
Using one of the palette knives I spread a small amount of paste across the cardstock, allowing a random pattern to appear. That's it. Done for a background.
The second experiment was to use the Shimmery White paste & a mask to create a pattern similar to the DSP shown in the picture above. This DSP is from the Mediterranean Blooms pack & as I will be continuing on with Citrus Blooms cards for Sunday's blog & thought it would be perfect.
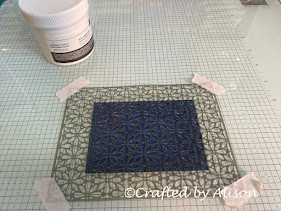
The cardstock is place under the mask which is then taped down with some washi tape.
The paste was applied over the mask & spread evenly so that there were no gaps. The finish is so pretty. It shines & sparkles & is quite similar to the DSP. Here it is again...

I hope this has been a help for you, whether you have been crafting for a long time or new to it, having knowledge about what to use & how to use it can make your crafting experience more enjoyable. If you would like more information about using any of the Stampin' Up® products then you can drop me an email at craftedbyalison@gmail.com.
That's all I have for you this week. My next blog is on Sunday & I will continue with the brand new beautiful stamp & die set, Citrus Blooms that was featured in last Sunday's blog. Last week I used the DSP images, this week I will show you how I used different colouring techniques to achieve some lovely cards.
In next week's mid week blog will continue to create with embossing paste, this time using colour to create different finishes. This is something I haven't tried before but I'm looking forward to learning something new & sharing it with you. I hope you can join me for both of them.
Til next week, take care & keep creating. XX Alison


Comments
Post a Comment