Hello & welcome to my blog,
My name is Alison & I am an independent Stampin' Up® demonstrator in Melbourne, Australia. I love creating cards & gifts for my loved ones & this blog will show you how to create something special for those you love. I blog twice a week, once on a Sunday where I mainly showcase a stamp set or dies & sometimes special DSP. My second blog is mid week on a Wednesday where I look at techniques, colour challenges, card sketches, fun folds, tools & equipment & ways to make or improve your projects. That's what this blog is about.
On 5th June this year I created my first post using one of the free card sketches featured in the Annual catalogue on page 22. Here is a link to that blog. This week I have the second card sketch for you. It's a very simple sketch so I've created 2 cards - one simple and one a little more fancy. I hope you enjoy them.
This is my copy of the Stampin' Up®s sketch...
... and here are the two cards I created using it...
The first card is the simpler of the two.
Using a Pumpkin Pie card base, I cut some Masterfully Made DSP measuring 7cm x 11cm. This was raised on dimensionals for a little 3D effect. The sentiment was heat embossed in white on Night of Navy cardstock & the ends were trimmed with the Banners Pick-a-punch. Before adhering it to the DSP I attached some Tear 'n Tape on the back so that I could add some Lemon Lolly Sheer ribbon which I had cut in half. The final touch was some green Adhesive Backed Glitter Sequins.
I always add a layer inside the card & with this one I added a small strip of DSP along the side.
For my second card I decided to make a more elegant card.
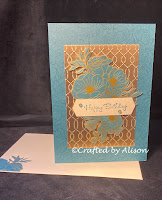
The base is Pretty Peacock & has been stamped, tone on tone, with some flowers from the Framed Florets stamp set. Next I embossed a piece of gold Brushed Metallic cardstock with the Softly Sophisticated embossing folder. The gorgeous flowers featured on the gold cardstock is fussy cut from the Forever Love Specialty DSP pack. It was then raised on dimensionals. The sentiment is from the Go To Greetings stamp set & is stamped in Pretty Peacock on Basic Beige & adhered to the flowers. To complete the card I added some Pretty Peacock Foiled gems.
In the final photos you can see the stamping on the card front & that I have added some fussy cut elements to the inside of the card. Even though the end result looks more intricate, it's actually not much harder to create than my first card. There was the fussy cutting involved but fussy cutting is a past time I enjoy while watching TV at night or when I need a little relaxation.
That's all I have for you this week. My next blog is on Sunday & I will feature a stamp set & dies called Beach Day that are perfect for the beach lover in your life.
In next week's mid week blog I will share another fun fold with you. I do love a good fun fold!
I hope you can join me for both of them.
Til next week, take care & keep creating. XX Alison


Comments
Post a Comment