Hello & welcome to my blog,
My name is Alison & I am an independent Stampin' Up® demonstrator in Melbourne, Australia. I love creating cards & gifts for my loved ones & this blog will show you how to create something special for those you love. I blog twice a week, once on a Sunday where I mainly showcase a stamp set or dies & sometimes special DSP. My second blog is mid week on a Wednesday where I look at techniques, colour challenges, card sketches, fun folds, tools & equipment & ways to make or improve your projects. That's what this blog is about.
Today I am sharing a fun technique I saw on Youtube where you use water colour pencils but instead of using a water brush/pen you use the Colour Lifter pen. It's brilliant! It's like a cross between water colouring & blending.
I took loads of pictures of the steps & colours I used to give you an idea of how easy it is to create using this technique.
The stamp set I chose is Petal Park as it has lots of lovely little flowers that are easy to colour.
I only have one old set of water colour pencils from Stampin' Up® so I used what I had & mixed up some of the colour combinations to give me more choice.
Here are the step by step pictures of the process...
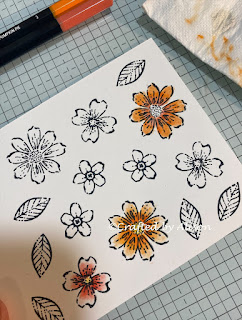
The first step was to gather my supplies & stamp the images.
I chose Pumpkin Pie & Real Red to get started, colouring in a small area near the centre of the flowers. Using the brush end of the Colour Lifter I then pulled the colour out from the centre towards the edge of each petal. This diffused the colour beautifully.
By using more of the Colour Lifter I then created a different result, pulling the colour further out.
The next combination I tried were Calypso Coral & Pumpkin Pie which gave a darker colouring.
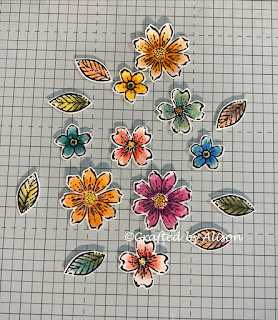
Next was Pacific Point & Bermuda Bay with some Old Olive & Daffodil Delight for some leaves...
I also played around with some Old Olive & Bermuda Bay on one leaf with a nice result.
So, while I was having a play around with colours I tried some Autumn tones with Pumpkin Pie, Early Espresso & Calypso Coral on some more leaves.
After a little bit of fussy cutting, these are the resulting flowers & leaves...
All that was left to do then was play around with some DSP, dies & stamps to create a card...
I chose Pecan Pie for the base & added a piece of DSP from Lovely Garden, wrapping some Natural Tones twine around it before adhering.
I die cut some Basic White using a Everyday Details rectangle & stamped some foliage in Mossy Meadow, Old Olive & Pear Pizzazz.
I stamped some more sets of the foliage & fussy cut them to add to the background.
All of the fussy cut images were then layered with glue dots & dimensionals to achieve a 3D effect.
The sentiment is from Country Birdhouse & heat embossed in Copper on Pecan Pie. I also brushed some Pecan Pie around the edges before cutting the end at an angle.
The final step was to add some Earth Tones Shimmer gems & add detail to the inside of the card...
So that's it for this post. I had a lot of fun playing around with this technique. It was fun to create some muted colours this way. Over the last year I have enjoyed exploring colouring a little more & this is another quick & easy way to use colour in your projects. I hope this might encourage you to play around a little with this technique.
My next blog is on Sunday & I will be creating using a colour challenge.
Next week's mid week blog features a 3D funfold.
I hope you can join me for both of them.
Til next time, take care & keep creating.


Comments
Post a Comment