

Using Mystery Stamping to create
Hello & welcome.
My name is Alison & I live in beautiful Melbourne, Australia.
For those of you who have previously visited my blog & are now returning, thank you. For those of you who are here for the first time, welcome!
Here's a little bit about me. I love creating cards & gifts for my loved ones & this blog will show you how to create something special for those you love. I blog twice a week, once on a Sunday where I mainly showcase a stamp set or dies, embossing folders, projects & sometimes special DSP and Wednesday evenings when I highlight a technique, fun folds or tools & tips. I would love to hear from you if you have any questions or suggestions & my email address for that is craftedbyalison@gmail.com.
Stampin' Up® 's Annual Catalogue was released last year with a very different format & it was a beauty! It was set out quite differently to previous catalogues but there are benefits to that. They now have sectioned it to have beginners, which is a step by step collection of materials in kits, then there is quick & easy where you select base materials & packs of pre-printed or diecut materials plus some stamp sets then there is create your way where you choose all the materials, stamps etc yourself & create your way! In the quick & easy section Stampin' Up® have also provided some inspiration with a colour wheel & information of various ways to use colour combinations. I explored this in a bit more detail in my 1/1/25 mid week blog & also in last week's blog. The mini catalogue was launched on January 7th and has now retired so there is only the Annual catalogue & the Online Exclusives until the next Mini catalogue is launched in September.
Stampin' Up® also have products available only online. These are called Online exclusives & have no end date, when the stock is sold out, that's the end of it. The new Annual catalogue is now live! If you'd like to browse the new catalogue online then click here. If you'd like a copy to hold in your hands, leaf through & put little notes all over it of what's on your wish list then shoot me an email at craftedbyalison@gmail.com or message me on my facebook page at craftedbyalison.
This week I decided to share a novel way of creating called Mystery Stamping. It's where a crafter will create a card then write steps of how they made it, to share with other crafters, one step at a time.
I have participated in a few Mystery Stamping sessions & every time they are easy & lots of fun. Today I am sharing steps created by Rachel Tessman from Stamp Your Art Out. Here is the link to her Youtube channel where she shows you how to create her card and if you'd like to check out the blog related to the same session, then please click here. Rachel is in America so she works in Imperial measurements but kindly included the metric measurements in her clues.
So, firstly, here is the card I created...

Materials to gather:
Trimmer w/scoring blade
Bone Folder
Paper Snips
Stamp set/s with outline images (or images that have
gaps…just not completely solid images) and coordinating sentiments
Four ink pads in favourite colours (not too dark)
Blending Brushes to go with the four colours
Tuxedo Black Ink
Versamark ink, Heat Tool, and White Emboss Powder
Adhesives
Basic Black Cardstock
Basic White Cardstock
Embellishments of your choice
Clue #1:
This will be a portrait style card with the opening on the bottom.
Cut and prep initial pieces…
Basic Black Cardstock
3-3/4″ x 5″ (9.3 cm x 13.6 cm)
Scrap for front sentiment
Basic White Cardstock
4-1/4″ x 11” scored at 5-1/2” (10.5 cm x 29.7 cm scored at 14.8 cm)
3-5/8″ x 4-7/8″ (9 cm x 13.3 cm)
3-1/4″ x 4-1/2″ (8.1 cm x 12.4 cm)

Clue #2:
Prepare front black scrap sentiment piece for card as this shape and size will be used as a guide when stamping the other images. This piece ideally shouldn’t be too large…maybe up to 2-1/2” (6 cm) wide by 1” (2.5 cm) tall. You want it to be noticeable but not the “star of the show.” Stamp sentiment, then heat emboss onto this piece of Basic Black.
Clue #3:
Choose coordinating stamp image/s. Position the 3-1/4″ x 4-1/2″ (8.1 cm x 12.4 cm) white layer vertically. Then randomly stamp one or more of these images with black ink. If it helps, position the sentiment strip in the upper right area as you do this so you know what it will cover up (you’ll want to avoid having anything important under there).

Clue #4:
Cut your 3-1/4″ x 4-1/2″ (8.1 cm x 12.4 cm) layer that you just stamped into four pieces. The pieces do not have to be equal, but I suggest making your first sample card this way. Cutting them to equal sizes would give you four 1-5/8” x 2-1/4” (about 4 cm x 6.2 cm) sections. You can get this by cutting in half straight up and down at 1-5/8” (4 cm) and then cutting each of those pieces in half at 2-1/4” (6.2 cm).
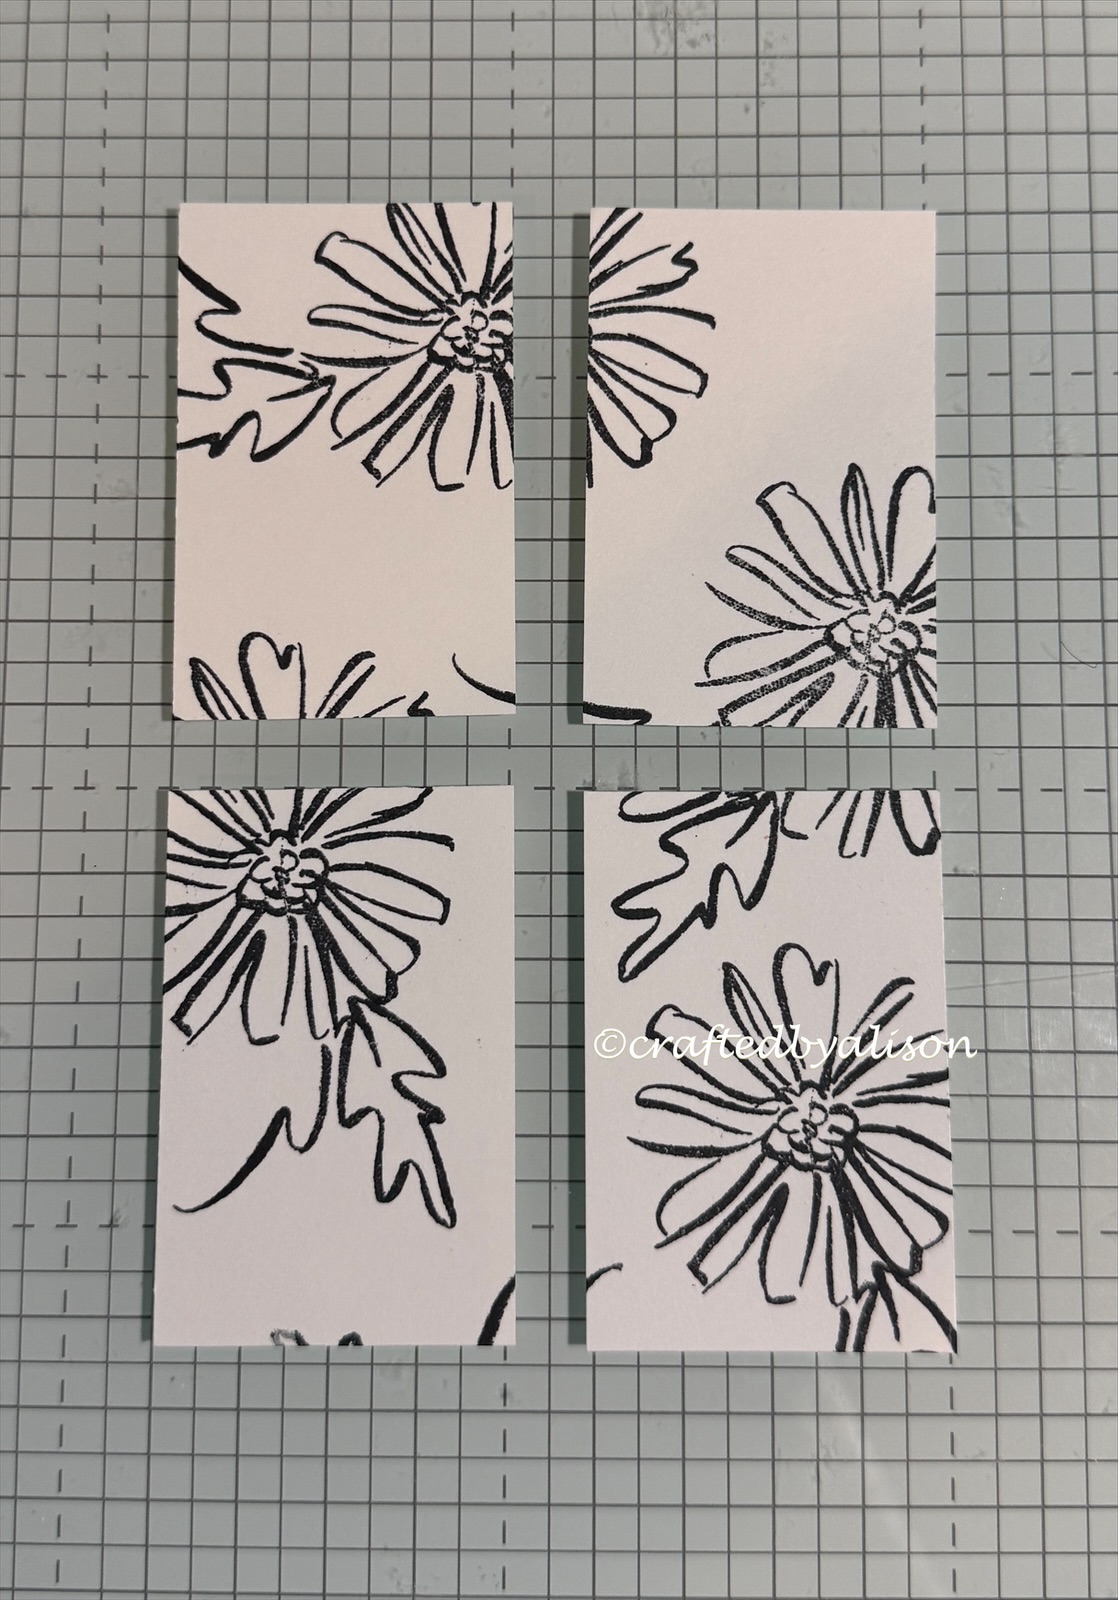
Clue #5:
You will be putting these back together on the front of the card eventually but with a slight gap in-between each piece. So, arrange your pieces so that they are a complete looking layer again. Then imagine colour radiating out from the centre…Using Blending Brushes and ink pads, add a different color ink on each of the four pieces so that the colour is more intense at the centre and fades to white at the outer edges.

Clue #6:
Adhere your four pieces onto your 3-5/8″ x 4-7/8″ (9 cm x 13.3 cm) white layer so that they re-form the full image with small gaps between the pieces. It might help to add them with just a small amount of adhesive at first. This way you can shift and shimmy everything if needed to make it all look balanced.

Clue #7:
Mount this onto the 3-3/4″ x 5″ (9.3 cm x 13.6 cm) black layer. Then add this to the front of the folded white card base. Attach your sentiment strip so that the right edge connects with the black cardstock border.

Clue #8:
Embellish with gems if you wish.
Stamp an inside sentiment if you wish. I chose Starburst Sequins as the colours went nicely with the blended ink colours.


Want to make a difference in someone’s day? Have an uplifting card ready to go at a moment’s notice with the Share a Smile Kit! This all-inclusive crafting kit offers fun, no-fuss crafting, with card bases, envelopes, and pre-cut paper pieces for making bright and cheery designs. Store the completed cards in the included notecard box until you’re ready to give them out!
If you would like to purchase any of my creations that I feature in my blogs they can be found in my FaceBook shop at craftedbyalison or you can order something unique.
I hope you've enjoyed today's post. I love creating in different ways, it keeps the creativity & MOJO topped up!
That's all I have for you this week. My next blog is on Wednesday & I will look at creating an focal element with a difference. This idea came from a online stamping event I attended a few weeks ago called Creativate.


Comments
Post a Comment