Posts

Showing posts from March, 2022

Mid Week blog #25 W-V fancy fold

Image
 Hello and welcome to my mid week blog, These mid week blogs are designed to be shorter than my Sunday blogs so that I can share techniques, card design or other tips and tricks with you. This week's card looks impressive but is easier to make than it looks. I saw a recent post from Rachel Tessman from Stamp Your Art Out where she featured a gorgeous card made using the stunning Symbols of Fortune suite. I gave you a sneak peak in last weeks Sunday blog & today I have all the details of how I made this card so you can make one yourself. This is my take on Rachel's card. Here are the measurements & precut pieces. The long strip is adhered to the left panel. The two small strips are adhered to the first 2 inside panels. Adhere DSP to one of the square white cardstock pieces & then to the right panel of the 16x8cm piece. I stamped  the images & sentiment onto the remaining 2 white squares using the Seas the day stamp set. The sentiment is positioned in the centre o

Seas the Day!

Image
 Hello & welcome to my blog! I'm so happy that you've popped by & I hope you like what I have to share with you today. If you love the seaside then I think you'll love this week's creations as they remind you of sunny days, sand between your toes, ice-creams on a hot day or rugging up in a warm coat for a walk along the shore on a cold winter's day. Most people have a special memory linked to the beach so I hope this week's stamp set, Seas the day,  helps you to remember a lovely time like that.  I loved creating with this stamp set & dies. It's such a fun set & creates beautiful cards. My first card was featured in my Mid Week blog but here's a recap of how I made it. I used a Basic White card base & blended some Coastal Cabana, Misty Moonlight & Pool Party for the background.  I diecut some seaweed fronds in Coastal Cabana & Old Olive & a frame using the Simply Marbleous blue tones. I then layered some of the weeds flat

Mid Week blog #24 Colour Challenge

Image
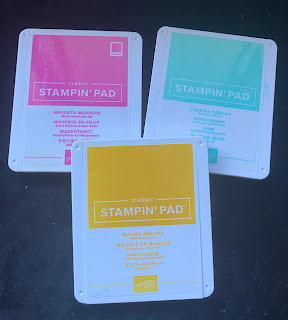
 Hello and welcome to my mid week blog, These mid week blogs are designed to be shorter than my Sunday blogs so that I can share techniques, card design or other tips and tricks with you. My focus this week is using specific colours to create a card. There are many groups & individuals who use colour selections to create. Some you wouldn't think of putting together, some seem made to be used together. This weeks colours are..... Daffodil Delight, Coastal Cabana & Magenta Madness Aren't they pretty? They're such bright happy colours so I chose to use them with the Seas the Day stamp set which I am featuring in my weekly blog on Sunday. I used a Basic White card base & blended some Coastal Cabana, Misty Moonlight & Pool Party for the background.  I diecut some seaweed fronds in Coastal Cabana & Old Olive & a frame using the Simply Marbleous blue tones. I then layered some of the weeds flat and attached some to the frame to give depth to the card. I sta

Hats Off to the boys

Image
 Hello and welcome to my blog. If this is your first visit, I hope you enjoy it & come back again. If you are returning, welcome back & thank you! This week I have a stamp set that at first glance screams 'For the boys' but once you have a play around with it you see that it can be for the girls as well. It's the Hats Off stamp set and I also used the co-ordinating Hat Builder dies to complete the cards. I hope you enjoy looking at what I created.... I have to admit, I used this week's creations as an opportunity to get my personal stash ready for a whole heap of work birthdays! My boss is turning 50, a supervisor is turning 40 & a co-worker whose birthday is this week is quite obsessed with Disney so hopefully I've got those 3 covered. The first of the cards uses the small cap die in a variety of DSP & cardstock. I chose earthy colours as this will be for a male but this design could easily be changed to pretty papers & cardstock for a female. I

Mid Week blog #23 - Tic Tac Toe creations

Image
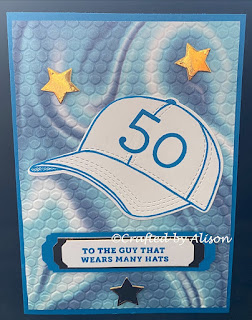
 Hello and welcome to my mid week blog, These mid week blogs are designed to be shorter than my Sunday blogs so that I can share techniques, card design or other tips and tricks with you.  This week I am showing you how to create using a selection process I came across called the Tic Tac Toe challenge. The idea is that the organisers (at tictactoechallenge.com) release a 9 square block each week that has 9 different ideas that you choose 3 from. It's a great idea to spark creativity & help you to think outside of your normal prompts. The 3 blocks that I chose were Bright colours, Metallic & Spring.  The inspiration for this card was to use a new stamp set that will be featured on my Sunday blog & also serves as a birthday card for my boss who is turning 50 shortly. So the Bright colours part is the beautiful Pacific Point cardstock, the Metallic is the gold foil stars & the Spring is the baseball cap. I didn't feel that flowers would be appropriate for my male b

Driving By

Image
 Hello and welcome to my blog. If this is your first visit, I hope you enjoy it & come back again. If you are returning, welcome back & thank you! This week I have a stamp set for you that is FREE during the Sale-A-Bration period. This promotion was meant to finish at the end of February but due to issues over the last few months it was extended. It sadly now has to end. But I did manage to get the super cute car themed stamp set - Driving By & made two cards to share with you today. The card with the balloons & ribbon was created for my Mid week blog where I explained how to create a card with a spine which I know as Book Binding. The card with the road was created just for fun. I'll walk you through the Book Binding card first. I started with some Coastal Cabana cardstock cut to a regular card size then score 2.5cm in from the centre score line. I attached some Coastal Cabana sheer ribbon inside then glued down the flap to create the spine. The DSP is from the fre

Mid Week blog #22 - Book binding cards

Image
 Hello and welcome to my mid week blog, These mid week blogs are designed to be shorter than my Sunday blogs so that I can share techniques, card design or other tips and tricks with you. For something a little different I am sharing with you how to create a card using the 'Book Binding' technique.  I first made a card using this technique at a card group a few weeks ago & it was such a quick & adaptable card that I wanted to share it with you. Here are the cards I made with my card group...... I decided to make mine slightly different by making them a conventional card size as the card group ones were slightly smaller. Here are my creations..... To create this style of card I cut a regular 21 X 14.8cm. I score at 10.5 then at 13cm. Fold & burnish both score lines. The thin area at the edge of the card which is created by both score lines is glued down to create the 'book spine'. If you are using ribbon in your design like this example then glue it down befo