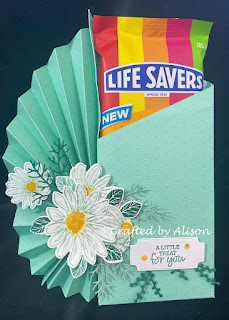
Mid Week blog #100! Gift presentation & mid week blog highlight recap
Hello & welcome to my blog,
My name is Alison & I am an independent Stampin' Up® demonstrator in Melbourne, Australia. I love creating cards & gifts for my loved ones & this blog will show you how to create something special for those you love. I blog twice a week, once on a Sunday where I mainly showcase a stamp set or dies & sometimes special DSP. My second blog is mid week on a Wednesday where I look at techniques, colour challenges, card sketches, fun folds, tools & equipment & ways to make or improve your projects. That's what this blog is about.
In this week's blog I show you a unique way to gift some humble chocolate bars so that they look impressive rather than humble plus I will recap some of the highlights of my previous 99 mid week blogs, including links to them.
First of all, let's fancy up the humble chocolate bar with some fancy wrapping.
I used DSP in my stash for this creation. Here are the steps I used to create the box.
To create the FAN.
Make a pencil mark on the 24cm x 22cm DSP 10cm down from the top right corner of the short side.
Place the DSP on the cutting board & cut diagonally from the left corner to the pencil mark.
Flip the DSP so the straight edge is at the top & score every 1.5cm along the 24cm edge.
Concertina fold each score line & burnish to the lines are crisp.
Fold the bottom up approx 5cm so that the bottom edge lines up with the edge of the DSP. Secure with some twine.
Apply glue to bottom part, fold up & adhere to the top part. Apply pressure to ensure glue holds.
Once dry, gently pull the fan out until there is a clear straight edge.
To create the BOX.
If using double sided DSP, place the focus pattern face down. Make a pencil mark 10cm down on the short side of the 23.5cm x 22.5cm DSP.
Place the DSP on the cutting board & cut diagonally from the left corner to the pencil mark.
Flip the DSP so the straight edge is at the top & the long side is to the left & score at 1.5cm, 10.5cm, 12 cm & 21cm. Turn 90° & score at 1.5cm across the bottom.
Fold & burnish all score lines.
Cut up at all score lines to the bottom score line. Mitre the small squares created at the long edge & centre & cut away the square at the short edge completely. Cut a small diagonal piece from this last edge.
Apply glue to short edge & adhere it to the long edge, overlapping so that the edge is at the back.
Fold mitred squares in & apply glue. Fold up bottom flap & adhere to mitred squares.
Apply glue to last flap, fold down 7 adhere to bottom flap to create a seal & the base of box.
Apply glue to long side of box. Carefully press length of fan along length of box & hold until glue is dry.
To decorate the box.
Create a flower or matted DSP circle large enough to cover the join in the fan. Decorate the box with embellishments, focus images, flowers etc. to suit the DSP.
- 1. Mid week blog #1 Corner fold card technique
- 2. Mid Week Blog #2 Triple stamping technique
- 3. Mid Week Blog #4 Masking technique
- 4. Mid Week Blog #5 Envelope fold cards
- 5. Mid Week Blog #11 Make your own gift bags
- 6. Mid Week Blog #13 Step It Up stamping
- 7. Mid Week blog #17 Heat Embossing
- 8. Mid Week blog #18 Make your own DSP
- 9. Mid Week blog #19 Treat boxes
- 10. Mid Week Blog #27 Accordion card
- 11. Mid Week Blog #29 Double Fold with Belly Band
- 12. Mid Week blog #39. Fun fold. Double opening flaps
- 13. Mid Week Blog #40 Simplify or Step it up!
- 14. Mid Week blog #43 Pop up greeting cards
- 15. Mid Week blog #44 Using Alcohol Markers for backgrounds
- 16. Mid Week blog #45 Dutch Barn Door fancy fold
- 17. Mid Week blog #47 Colouring directly onto stamps
- 18. Mid Week blog #48 Reverse easel funfold
- 19. Mid Week blog #49 Partial diecut card technique
- 20. Mid Week Blog #55 Funfold with a secret pocket for gift cards
- 21. Mid Week blog #57 Make your own gift bags
- 22. Mid Week blog #58 Fancy fold - step card
- 23. Mid Week Blog #59 Creating gorgeous Octagonal Boxes for gift giving
- 24. Mid Week blog #61 Faux tile technique
- 25. Mid Week blog #62 Using alcohol markers to colour DSP
- 26. Mid Week Blog #64 Elephant Parade Pop up step Fun Fold
- 27. Mid Week blog #71 Using Versamark as a watermark
- 28. Mid Week Blog #77 Making a hinged cigar box
- 29. Mid Week Blog #78 Creating distressed watercolour cardstock
- 30. Mid Week blog #82 Side Panel Pillar fun fold
- 31. Mid Week blog #85 Floating strip technique
- 32. Mid Week blog #90 Starburst design cards
- 33. Mid Week blog #92 Offset gatefold funfold
- 34. Mid Week blog #93 Blending tips
- 35. Mid Week Blog #94 Flying Seagull funfold
- 36. Mid Week Blog #95 Creating little gifts for special occasions


Comments
Post a Comment